Weather Routing Pi

Author: Sean D’Epagnier, August 26, 2021, Version v1.0
Maintainers: Rick Gleason, Jon Gough and the Plugin Team
Development Details: PI Manager (PIM) Workflow uses the Testplugin Template
Links
-
Maintainer Source: https://github.com/rgleason/weather_routing_pi
-
Installation Instructions: Plugin Download, Install and Enable
-
Legacy Downloads: https://opencpn.org/OpenCPN/plugins/weatherroute.html
-
Cruiser’s Forum Thread: Weather_Routing_pi
Associated Plugins
Create optimized routes based on:
Weather and Land Data: Land Mass, wind, wave and current
-
Chartdownloader chartdldr_pi to download High resolution (GSHHS) required to Detect Land.
-
Climatology_pi Data for default examples and longer voyages. 30 years of NOAA wind, wave & Current data, averaged by month. Climatology is required to run the Examples.
-
Grib_pi (grb, grb2) Data predictive wind, wave & current. Used daily, but not with initial Examples.
-
Instructions Install and Enable these plugins now.
Boat Performance Data: Polar Files
The quest for perfect polars. There are many factors involved and various sources.
-
Polar_pi Create Polar files from recorded nmea0183 or vdr data.
-
VDR_pi Record the OpenCPN nmea0183 data stream.
-
Your boat’s Boat Performance Data - Polar Data or Outside Polar File Sources. Accuracy may vary significantly in different conditions. Three sources for Polar Files:
-
Polar sample files: (700) provided from within the plugin. Accuracy for your boat may vary dependent on loading of stores, sails, sail trim, bottom condition and sea state. Many of these polars, some developed by the Builder’s Marine Architect using VPP assuming ideal conditions, are overly optimistic! WP has a simple solution, adjust the Wind Strength percent under the Configuration Advanced Tab until you get some good recordings to use.
-
Actual performance: measured in specific sea conditions recorded by VDR_pi and converted by Polar_pi. The best recordings are with Zero current, noting sea state and sails set and trim.
-
Calculated Polars: Velocity Prediction Programs (VPP) - L-36.com list and ORC Offshore Racing Congress and ORC VPP Documentation PDF. Another reasonable one I like is TechSail Sailfish Yacht Analyzer. These VVP are usually based on theoretical and optimal conditions.
-
Boundaries: Routing Avoidance
-
Ocpn_Draw_pi Create boundaries for routing avoidance: dangerous areas, sea, land, storm or hurricane.
Purpose of Weather Routing (WR)
Luckygrib has superb introductory documentation for WeatherRouting. This started out as an excellent grib viewer/download for ipad and imac only. This documentation is worth reviewing first for general principals.
What is WR useful for?
-
Trip or voyage planning.
-
Establishing good weather windows for trip starts.
-
Calculation of multiple routes at the same time.
-
Highlight and step through multiple “completed' routes at the same time.
-
Study for best routes dependent on goals and constraints set.
-
Adjust Wind Speed as a percentage, which helps to set realistic goals.
-
Include multiple polars in your Boat file for different conditions and sail sets.
-
Include a motoring polar in your Boat file particularly for light winds.
-
Power Boat use for trip start time, fuel reduction, comfort routing and ETA.
-
Route around predicted high winds (hurricanes), light winds, large waves, etc.
-
Show possible sail changes and % crossover.
-
Compare routes with Grib file currents enabled and disabled.
-
Attach two downloaded grib files (weather and current) with similar location and time.
-
-
Summary metro table of the voyage for good weather visual.
-
Views and Reports
-
View settings.
-
Number of tacks, % upwind/downwind, etc. to determine how difficult the voyage will be.
-
Trip Summaries: Estimated total time, distance, average speed etc. to help determine the stores needed.
-
-
Planning airline tickets (but only as a very very rough estimate).
-
Remember that it is only as good as the accuracy of your polars and predictive and average data!
What does WR look like?
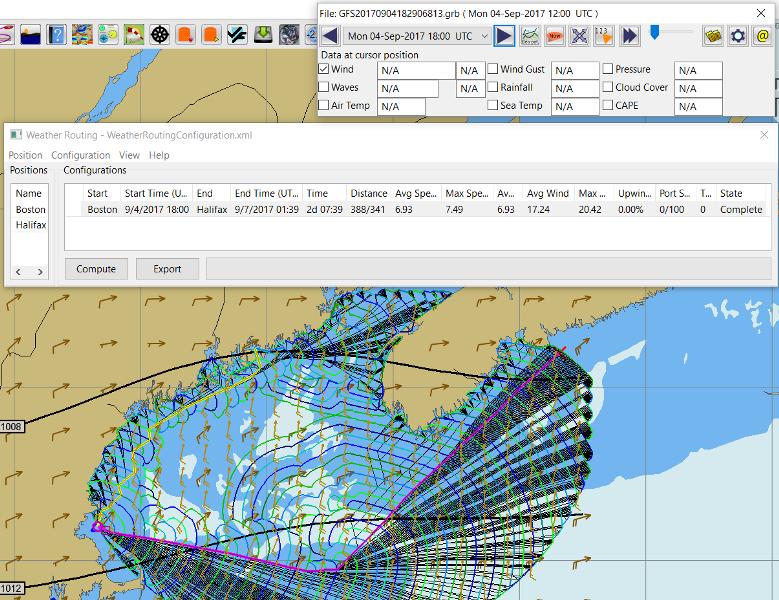
Weather Routing: Calculation of the fastest/safest route from a starting point to an ending point given the current national weather forecasts, available wind data, current oceanic currents , the performance of your vessel, and comfort criteria (storms, wind, waves, etc.) Altendorff Routing Algorithms - More about Optimum Weather Route
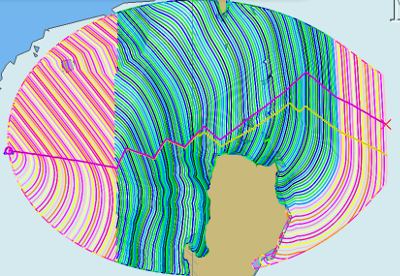
When the weather route is displayed, Grib and Climatology calculations use different color schemes as in the route above. * Grib = Blue-Green-Purple. * Climatology = Red-Pink-Yellow where the Grib data does not exist.
Wind Data Sources: Grib and Climatology
-
Isochrones While calculating a Weather Routing the plugin will calculate the location of the boat for a given time interval (eg: 1 hr, 4hr, 6 hr or 12hr ) and display an isochrone contour line which represents how far the boat will sail in a given direction, based on the weather and boat conditions, for each successive time interval. Isochrones are like contour lines around the starting point. Think of Isochrones as showing an intermediate destination time lines with different distances from the start point.
-
Left Pink-Yellow Isochrones: Beginning passage uses Climatology data because the boat is outside the Grib area.
-
Middle Blue-Cyan Isochrones: Computation is based on Grib data.
-
Right Pink-Yellow Isochrones: End of passage, Grib data not available so again Climatology data is used.
-
If the transition from grib to climatology is not uniform, then the climatology data is not as reliable in that situation.
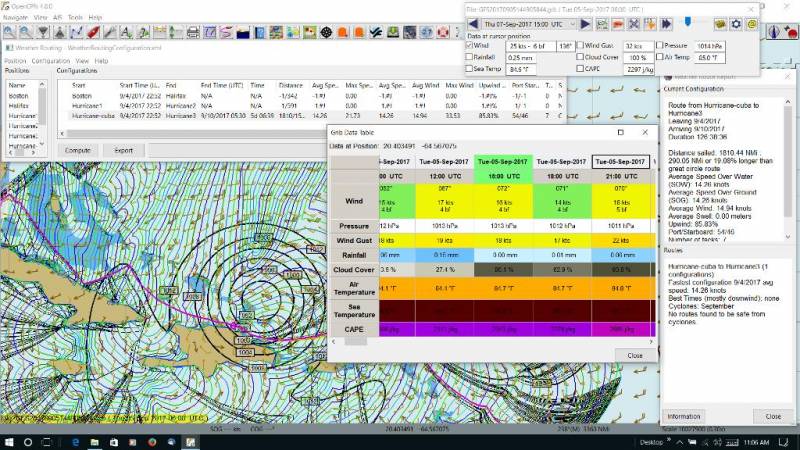
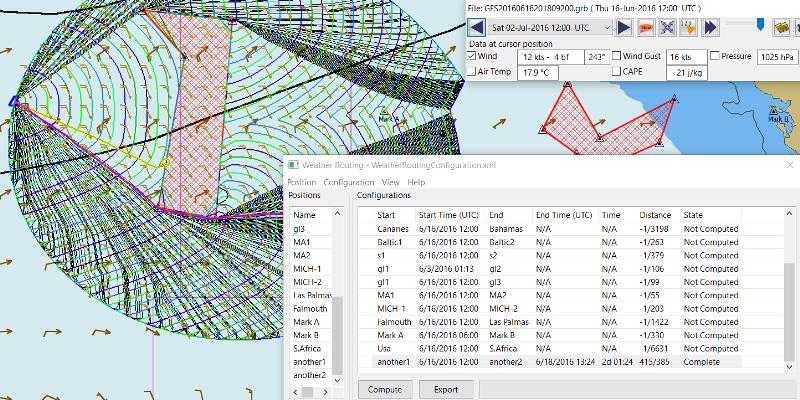
Example: Routing around Hurricane Irma in avoidance mode. Showing colored Grib_pi Weather Data Table exposed with a Right Click on Chart and the Trip Summary Window activated by Weather_routing View > Report & View > Plot.
Terminology and Route Icons
-
Route or Optimal Route: Thick magenta line from the start “triangle” to the finish “X”.
-
Cursor Route: Thin yellow line that follows the cursor around. This is the optimal route to the cursor.
-
Triangle: Start point defined by the “Weather Routing Position” selected in the “Configuration”.
-
X: End point defined by the “Weather Routing Position” selected in the “Configuration”.
-
Square: Small squares along the route, are sail/polar file changes (Not shown).
-
Circle on the route is the calculated Boat location for that time frame as set in Grib_pi.
-
Help > Information Menu (Configuration) Menus and Definitions
-
Terminology Reference used in this Manual.
-
Configuration and Computation of a optimal routing is at the center of the plugin.
-
Configuration Defaults are reset after hitting Reset all Advanced.
-
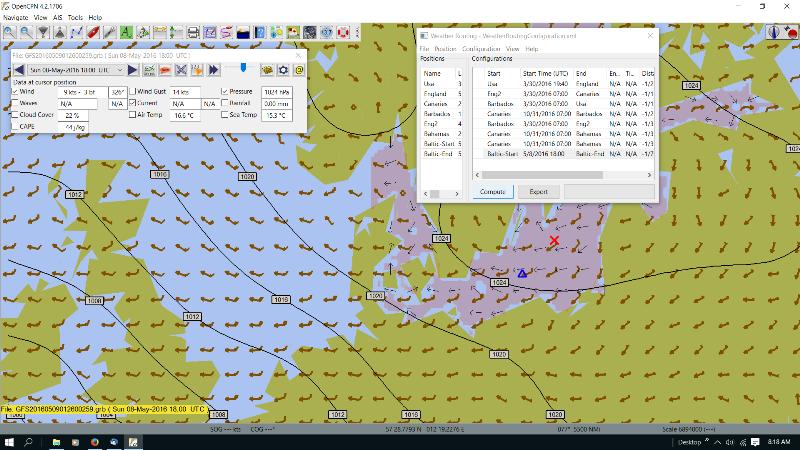
Configuration Five default configurations using Climatology_pi. Initial Default Examples ready to Compute and Complete.
-
Compute After configuration of the routing, select Compute. The routing will Complete or Fail with a message
-
Techniques and Tools
Weather Routing is a "very capable" plugin which can use six other plugins concurrently, so stick to basics when starting out.
-
Grib Step Through Time Interval Step through the Grib file changing time interval, frame by frame, hour by hour, to understand the Routing.
-
Grib Time Routing Start time must be inside the particular grib file’s time period. If the routing takes longer than the grib, the routing will fail:grib unless Climatology_pi is enabled and set in Weather_routing. Start time can be set quickly in WR Menu Configuration > Basic Tab > Grib Time button As you learn more, you can refine start and end times.
-
-
Data at Cursor: Run your cursor along the route with the Grib_pi Menu and “Wind speed at Cursor” on. It is very useful for diagnostics along a problematic route.
-
Grib Weather Table: When a grib shows on the screen, right click and pick Weather Table (see screenshot below)
-
WeatherRouting additional information After computation of a routing, highlight the Configuration, pick View in the menu at the top then select Settings, Statistics, Report, Plot or Cursor for more information. (see screenshot below0
-
WeatherRouting View settings Pick View > Settings.
-
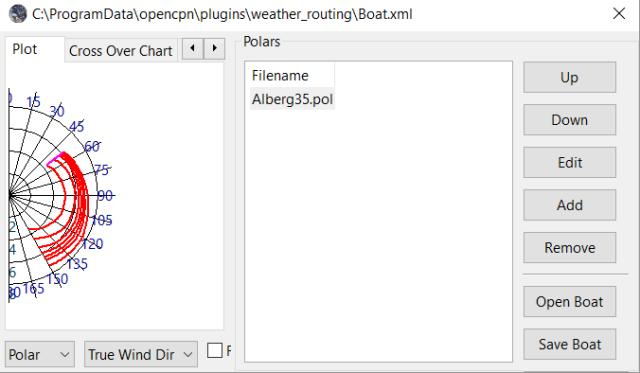
Help > Information Menu (Configuration) Access this page from the Help > Information Menu. Review while stepping through the plugin menus, looking particularly at Edit Boat.xml and Edit Polar File (.csv, .txt, .pol) Try to understand the menu system. Boat.xml simply contains a list of boat polar files to use in the routing. The polar files can be edited, saved and saved as.
Summary
-
Use the Grib Plugin and recently downloaded grib files for completing grib predictive routing (1-8 days).
-
Use the Climatology Plugin to find and plan long term cruising routes, (most useful in prevailing winds areas).
-
Use both Grib and Climatology data, to allow the routing to be extended past the time/date range of the grib file, which uses Climatology data to extend the Routing based on NOAA “average” or “most likely” data.
-
Use both Grib and Climatology to use “tidal current data” if the grib does not contain it, or to use climatology to avoid areas ofcyclones.
Goal
Your first goal should be to read this manual several times while trying to understand the menus and structure. Then to make a routing yourself. The “Configuration” and “Computation” of an optimal weather routing is at the heart of this plugin.
Weather_routing is remarkably flexible, but with that comes complexity. New users must not dive in changing settings without understanding what they are doing or how it affects the Computation.
-
Generally the Configuration Default settings are the most reliable available. After hitting Reset all Advanced most of the advanced configuration settings can be left alone.
-
However there are definitely some Configuration settings the user must set manually in order to get any results!
-
The first goal is to Complete your first routing successfully.
Please follow this tutorial carefully and you will succeed the first time. Once you get familiar with the interface and have had successes, learn all the features gradually, changing and adjusting one setting at a time. Use Reset Advanced Tab to go back the working defaults when you run into trouble, or install the example files again for a fresh start.
Cleanup Prior WR Installation
Before starting, backup your own personal user data from this plugin. In particular your Boat.xml file and your boat’s unique polar files, and any WR routings you wish to keep.
Generally we recommend that the plugin and configuration artifacts should be completely removed before installation of the new version, in order to allow the intended initialization files to be copied from the System folder to a User Writable folder. The plugin expects a clean environment before initializing and copying the appropriate files into the user directories. You must “Clean” your opencpn files of all weather_routing files and folders or the initialization that is required will not occur. For windows users, from:
-
C:\Program Files (x86)\OpenCPN 4.8.0 —> Run Uninstall Weather_routing.exe as administrator.
-
C:\ProgramData\opencpn —> Open opencpn.ini in Notepad++ and remove all lines for weather_routing and weatherrouting, including the order of plugins “weatherrouting” reference.
-
C:\ProgramData\opencpn\plugins —> Remove the Weather_routing directory.
Start Installation
1.Setup Grib_pi
Grib_pi is installed with OpenCPN. Learn how to use it and download a fresh Grib file with wind, current & waves.
-
Initially the grib area should be larger than the area between start and finish by at least two time intervals,
-
The number of days Should be for several more days than expected and dependent on how long the voyage is expected.
-
Set the grib at the starting time and then move it one or two time intervals forward, later with more experience you may set the Grib data and time at what you want.
-
Request and install a new grib file and learn how this plugin works.
2. Setup Climatology_pi
Climatology_pi must be installed and enabled as directed for default examples to work.
-
Climatology_pi is Enabled under Opencpn Options > Plugins.
-
Weather_Routing in the Menu Configuration > New or Edit > Data Source > Climatology select from the Dropdown Menu Most Likely which we use almost exclusively.
-
Weather_Routing will then access Climatology Data.
-
Adjust Climatology settings for the wind roses and learn how this plugin works.
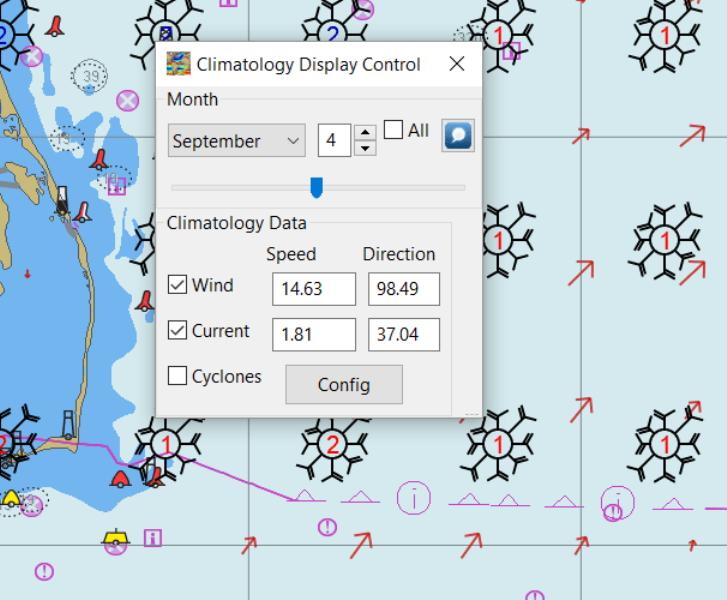
Climatology NOAA 30 year average Wind and Current data in September near Cape Lookout
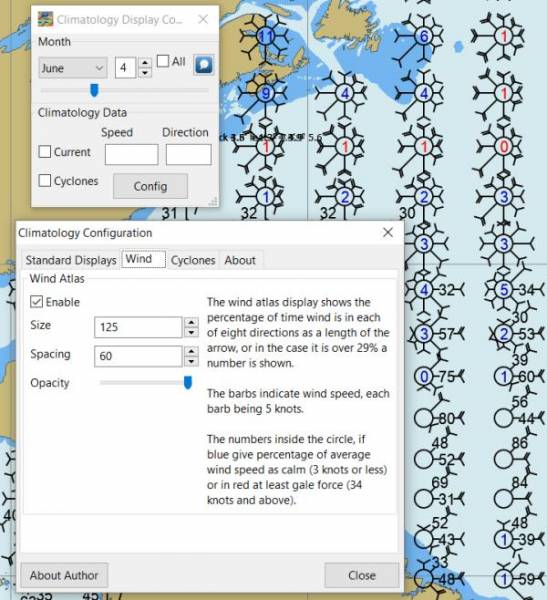
+ Climatology Configuration of Wind Roses Size=100 and Spacing=50 is good.
3. Install GSHHS High Resolution Background
If you are working with Land Interferance Detect Land you must install GSHHS.
Use Chart downloader to download and install a GSHHS High Resolution Background for routing with Detect Land checked.
-
Select the GSHHS Catalog and update the catalog. Then download the GSHHS to the default location.
-
We also suggest that under Options > Charts Tab > Chart Files that you add the path to the GSHHS files.
-
Then in the Chart Group Tab make a new Chart Group named GSHHS and add the path to them.
-
Then you will be able to select the GSHHS Chart Group with no charts to save memory and speed up your computer.
4. Setup Weather_Routing_pi
Install and Enable Plugins and the weather_routing plugin from within OpenCPN using Options > Plugins
That’s it. But before you can actually use Weather_Routing_pi, you first have to
-
Confirm that the Weather_Routing Plugin has been installed and enabled.
-
Enable Grib_pi plugin which is included with OpenCPN.
-
Confirm Climatology_pi plugin has been installed and enabled (required by Default Example files).
-
Confirn that Climatology has been set to Most Likely in Weather_routing Configuration.
-
Confirm that GSHHS High resolution files have been installed.
Note: Legacy PI Package installation files are still available from Download Page -Linux, Windows, Mac. Make sure you choose the file that is compatible with your computer system.
5. Enable OpenGL
Activate OpenGL in order to have the route display on top of the grib layer! Options > Dispay > Advanced > Check Use Accelerated Graphics
6. Check Files & Pathnames
This is the typical configuration for Windows (Linux uses comparable User accessible directories):
-
Main Path for support files: C:\ProgramData\opencpn\plugins\weather_routing
-
WeatherRoutingConfiguration.xml: C:\ProgramData\opencpn\plugins\weather_routing
-
Polar Files (.pol,.txt,.csv): C:\ProgramData\opencpn\plugins\weather_routing\polars
-
Boat.Xml Files: C:\ProgramData\opencpn\plugins\weather_routing\boat
7. Run some WR Routes
-
Start Climatology_pi, although it will start automatically if called.
-
Start Grib_pi (normally used, but not necessary with the default “Configurations” which use Climatology.
-
Set the Grib Date has been already set in the default configurations.
-
Then open Weather_routing_pi.
-
Confirm the “Boat section” path is correct as shown above in the Pathname list.
-
Confirm the “Polar” path is correct as shown above in the Pathname list.
-
In the menu you should find 5 configurations for transatlantic routes.
-
Pick a route and then select “Compute from the bottom of the menu.
-
Check that the isobars and route is drawn.
-
Try Computing the other routes, noticing how the settings have been changed, and what files are being used.
-
Once you are pretty confident about this, go to the next step, which is to create your own configurations.
8. Four Transatlantic Configurations
The plugin is packaged with 4 configurations using Climatology Wind Data that should Compute out of the box. The 4 Weather Routing Configurations in the Weather-Routing-Configuration with require installation and Enabling Climatology_pi and selecting Climatology dropdown menu Most Likely in the WR Configuration.
To run one of the initally installed examples simply highlight one of the routing Configurations in the main menu and then select Compute.
9. WR use requires realistic goals & sound judgment
After learning through use of the Examples, you should Configure weather_routing to match your sound judgment and realistic goals. You are in control, use your own judgement when you review the results. Weather_Routing_pi is just a tool in your hands, you are in control.
10. WeatherRoutingConfiguration.XML Menu
If the plugin is installed and enabled, with default settings unchanged or Reset all Advanced is used, the plugin should create an optimized weather routing with just a few specific additional settings and Computation.
-
Complete Setup Grib_pi Data and Setup Climatology_pi Data as described above.
-
Start by clicking on the Toolbar Weather_routing plugin Icon to open the Weather_routing_Configuration Menu.
-
WR WeatherRoutingConfiguration.xml Menu
-
NOTE: You are now diverging from the Example files, and learning how to configure a new route using Climatology Data.
-
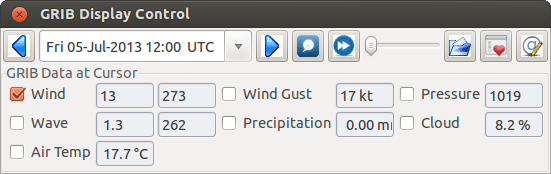
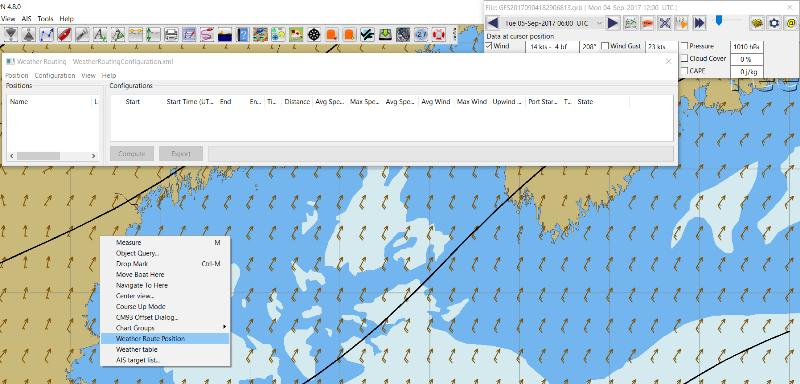
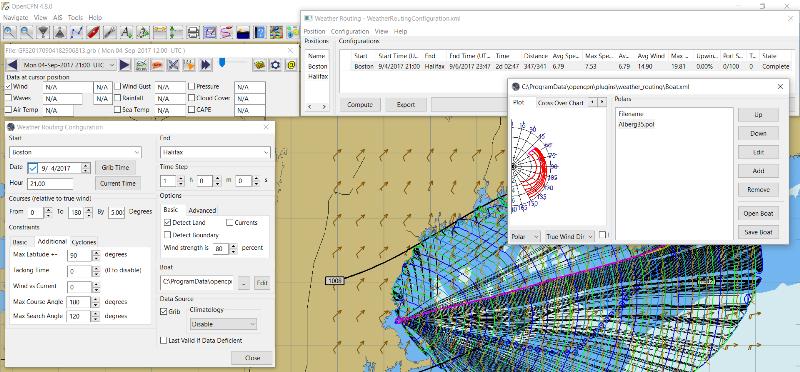
Define two Weather Route Positions on the chart within the “grib area”. Hover the mouse at a selected location, Right Click, and then pick “Weather Route Position” from the popup menu. Make a “Boston” and a “Halifax” Weather Route Position.
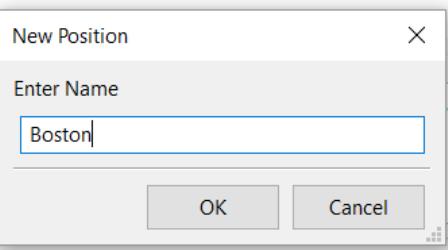
image::ccc-castine-grib.png[title="Grib Display Control",width=500,
-
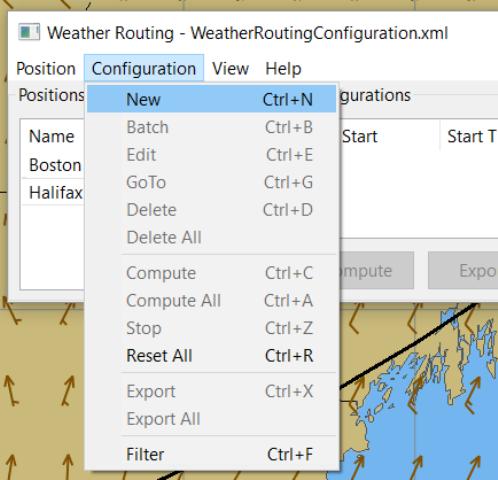
In the WR WeatherRoutingConfiguration.xml menu select ConfigurationNew. The Weather Routing Configuration Menu will appear with “Start”=Boston and “End”=Halifax.
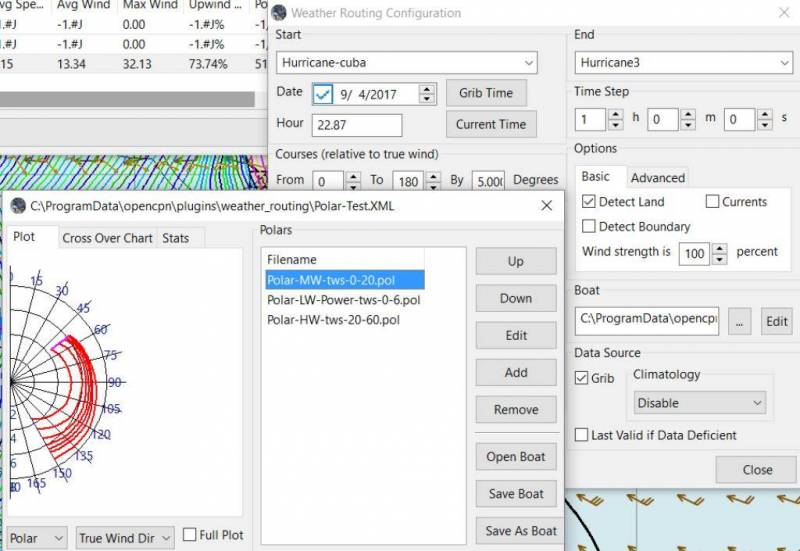
11. WR Configuration Menu
-
Scan the setting to check that they are as shown in the image.
-
Check Start and End selections. If not correct, select these WP Positions from the respective dropdowns.
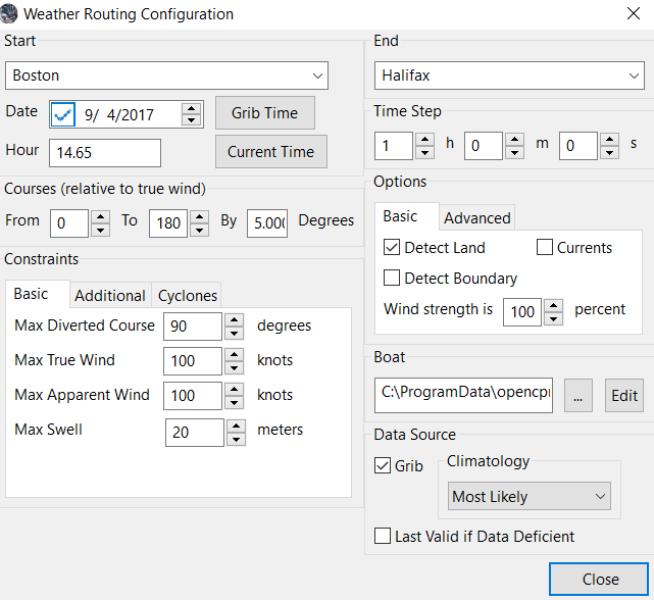
-
Set Start Date & Time. If you have set start date & time in Grib_pi as described above.
-
NOTE: You can download appropriate grib data and load it into grib_pi for this exercise, or you can just use Climatology data, it won’t make a difference.
-
From the Weather Routing Configuration Menu click Grib Time to set the Start Date/Time used by the “Configuration” for the routing. The Grib Time used will be the current frame used and visible in Grib_pi. There are other ways to do this, but use this way to start.
12. WR Configuration > Boat.xml Menu - Edit
Weather_routing_pi uses [Boat].xml files to store multiple [Polar].pol, *.csv or *.txt filenames which are used with the Current ”Configuration”. Also the [Boat].xml file can be “Save as Boat” to another boat filename such as Boat-Test.xml or [Your-Boat-Medium-Wind-Heavy-Sea-Clean-Bottom].xml.
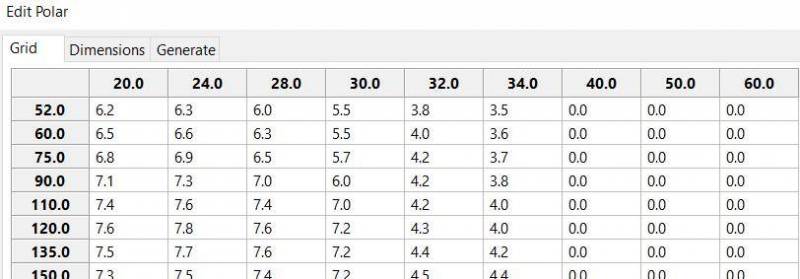
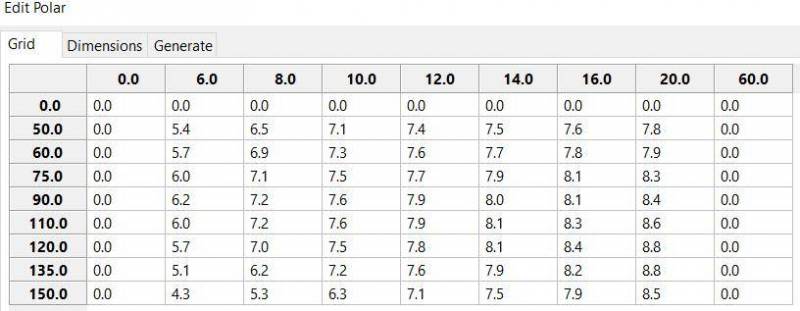
Many new users have have trouble “Completing” Weather Route Configurations due to Polar:Fail messages, which is often because the single polar they have used only has TWS from 6-20 knots and does not span the entire true wind speed range of the particular grib file being used.
| This files below are an earlier example and are still useful at times. However the plugin now comes configured with a new set of Example files all ready built_in. It it best to use those examples unless you want to start out fresh. The file names are similar but the details are a little different. We will try to update the files below to match the one in the distribution, ..at some point. |
To help new users when starting out, we have created a Boat-test.xml file that references three “polar-xx-xxx-x-xx.pol” files which cover a full TWS (True Wind Speed) range of 0-60 knots. The Weather_routing Configuration will utilize the best polar information from the multiple polar files in Boat-test.xml after computing the “Sail/Polar Crossover” calculations between the different polar files being used.
unzip to C:\ProgramData\opencpn\plugins\weather_routing\boat which are preconfigured files that should work with the Polar and WeatherRoutingConfiguration.XML file downloads. These files are the same as 4. Setup Weather Routing* above.
-
Boat.XML
-
Boat-test.XML
-
Boat-Test-Power.XML
Later on, after some successful weather routings, users are encouraged to create separate boat performance [polar].pol files for:
-
Sets of Sails Used (Sail Changes, First & Second Reefs)
-
Sea conditions (Waves - Rough, Chop, Height, Period)
-
Boat load (Race Light, Cruising, Heavy)
-
Boat bottom condition (Smooth, Grass, Barnacles, Loaded)
Example of useful Polars
-
LW-light wind (0-5 knots) Sail set #1
-
MW-medium wind (5-18 knots) Sail set #2
-
HW-heavy wind (18-24 knots) Sail set #3
-
SW-storm wind (24-32 knots) Sail set #4
-
GW-gail wind (32-60 knots) Hove to, Drogue.
-
LW-lightwind-Power (0-3 knots) Polluting Internal Combustion Engine
Using the sails normally used for each type of wind, such that the full range of True Wind Speed (TWS) is represented (0-60 knots).
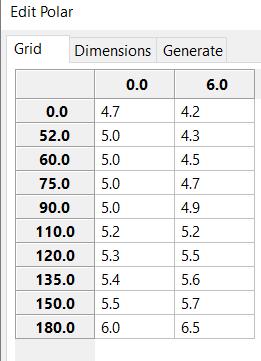
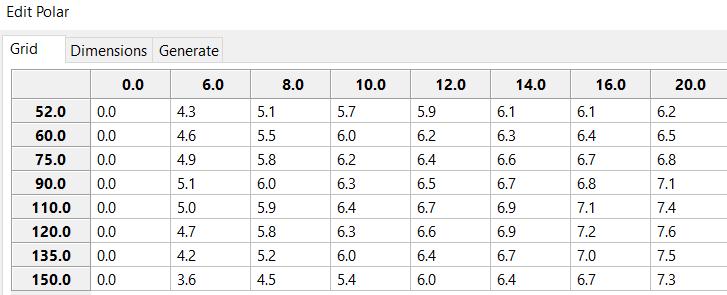
| These files can be inspected and edited with a text editor such as Notepad++ or they can more easily be edited using the Polar section Edit Menu and the two Tabs Grid and Dimensions. Learn how they are formatted (particularly *.pol) as this will assist you in creating useful polars for your boat. |
Polar Files for Learning (User Friendly)
Please Download, unzip and copy the six *.pol files listed below into your data\polars directory. For Windows use: C:\ProgramData\opencpn\plugins\weather_routing\data\polars These files are the same as 4. Setup Weather Routing above.
Three Stepped Range TWS Files used together
Use either Sail or Power for TWS-0-6
-
TWS-0-6-Power.pol (power for light winds)
-
TWS-0-6.pol (sail set light winds - 170% Jib)
-
TWS-0-20.pol (sail set medium winds -120% Jib)
-
TWS-20-60.pol (sail set heavy winds - Trysail and Storm Jib)
Single File with Full Range TWS 0-60 knots
-
Test-TWS-0-20+60.pol
[Boat].xml files are normally located here for Windows: C:\ProgramData\opencpn\plugins\weather_routing
In Boat.xml Menu Edit please Add these files
-
TWS-0-6-Power.pol (use power in light winds)
-
TWS-0-20.pol
-
TWS-20-60.pol
Use of these three files will cover a wide wind range from 0-60 knots (with 0-6 under power). If you just want to use one file for TWS 0-60 knots use Test-TWS-0-20+60.pol.
Once the three files have been added, next pick Save as Boat then type Boat-Test and “Save” to create and save “Boat-Test.xml”
Now when Computing “new” Configurations first check the configuration by selecting Boat-Test.xml at the Boat section “….” just ahead of “Edit” in the “Configuration” Menu. Once that completes properly, then create a “Boat.xml” file for your boat with reference to your normal boat polars and use that.
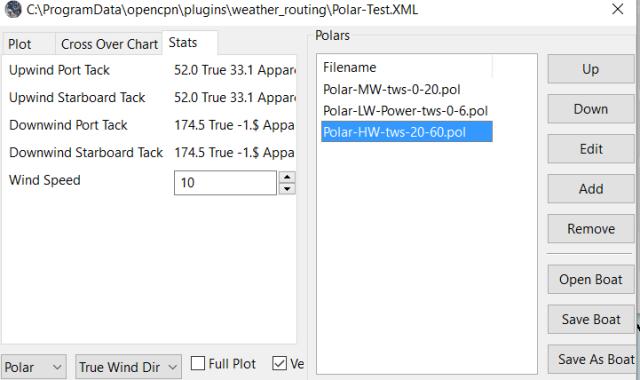
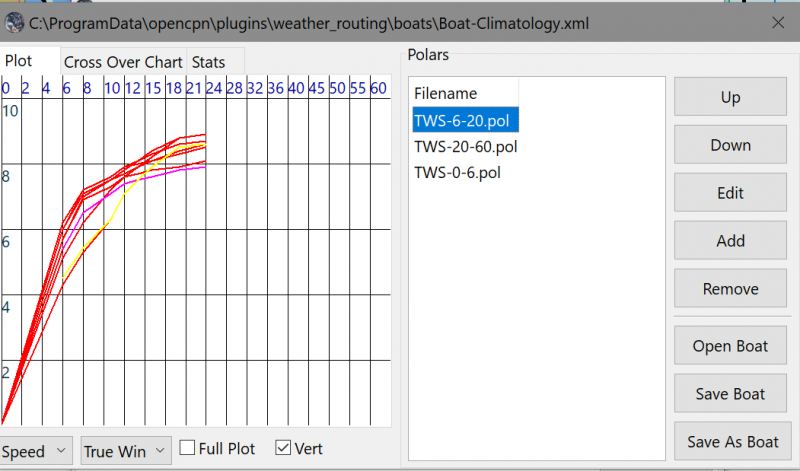
Plot Tab
Shows the highlighted polar file graphically as a familiar polar diagram. Note that the dropdown menus at the bottom provide different useful ways of viewing the boat performance data.
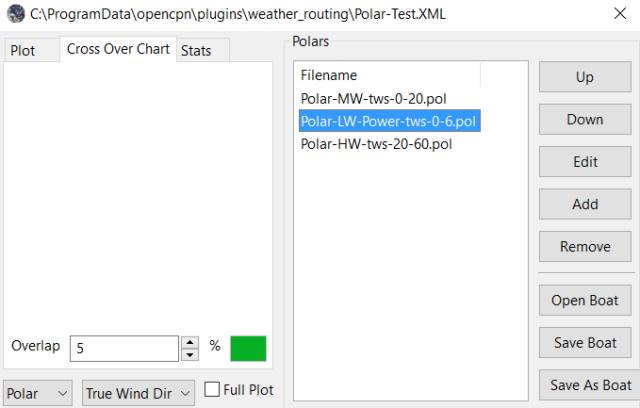
Cross over Chart Tab
Shows the Sail/Polar Cross over calculations.
Stats Tab
Shows target speeds.
Complete Setting up “Boat” Performance & Polars * Weather_routing_pi will use this data to calculate the most favorable route. * Later you can find a Boat Polar file that is closer to your boat. * Click Save Boat to close the menu and save the [Boat]/Polar-Test.xml file. * Then “Close” Weather Routing Configuration Menu.
13. Compute "Routing" in WeatherRoutingConfiguration.xml Menu
-
In the WR WeatherRoutingConfiguration.xml menu, highlight the Routing you’ve created and select Compute.
-
Now new isochrones will be created and a weather routing from Boston to Halifax will be “completed”.
14. Messages in Configuration Window
In the Configuration Menu after “Compute”, a message will show to the right of the Configuration.
“Complete” affirms that the computations completed. “Fail” indicates they did not and that some setup parameter may be out of range. The failure messages have been made to be more descriptive to help.
If your polar doesn’t include boat speeds:
-
Above a windspeed that the grib tries to use, it will fail to route.
-
Below a windspeed that the grib tries to use, it will fail to route.
There are many reasons a Computation cannot complete, or fail. The computation is dependent on:
-
Wind Data (grib_pi or climatology_pi) - Start & End data/time of the file, interval downloaded.
-
Boat Polar File - Correct format, with a wind range that matches the grib data.
-
Time Interval Issues - Sometimes 1/2 -1 hr interval will yield a better route than 3-4 hr and it may help “Complete”.
-
Max Diverted Route - Normal setting is 100 degrees, which speeds up calculations, but with longer time intervals, you may have to set this on something like 140-160 degrees to complete the routing, particularly when the Finish is near land with Islands and Peninsulas around.
-
Configuration settings which must be made to be compatible with the data to Complete:
-
Interval Issues - Too long a calculation interval for the distance between start and end.
-
Land Detail - Detect land is checked and the High Resolution GSHHS Shoreline is not installed.
-
Land Interface Failure - Routing near land is complex, zoom in and look at the Isobars. Sometimes they are not calculated for all locations due to the complexity of the land (not enough detail or iterations). Try new Weather Routing Position nearby where there are isobars shown, or shorten the time interval or max diverted course.
-
Max Diverted Course - When “Polar:Fail” or “Polar:No Data” occurs near the “finish” using large Time Intervals (4hr - 24hr). Zoom in and look at the route, isochrones, finish, and land. If the route is almost completed to “Finish” (with land, islands and peninsulas around) try changing Max Diverted Course from 100 degrees to 150 degrees and run it again. It will probably complete.
-
Different Time Intervals - Keeping everything else the same.
Beginners should first try a simple route, with starting point and end point, 5 degree steps, and possibly a 3 hour time interval until they see it is working. The time interval depends on the speed of the boat and distance traveled, grib file downloaded.
-
If the Configuration was completing Computation earlier and you changed a setting, check that first.
-
If a Configuration fails, another thing to try is Reset All, and go through the setup sequence above, again.
-
If “Polar:Failed” try increasing or reducing the Weather Routing ConfigurationWind Strength % (50%, 150%) because the Polar File may not have the required winds specified. The grib file may have periods of very high winds or very low winds which are not covered by the polar diagram wind range.
-
Then try using different data, either change the grib start date, moving it forward, or try using only Climatology Data, or change the Polar File to something else, or add multiple polar files, just to get the Configuration working.
15. Configuration - Edit
Provides setup flexibility for various factors:
-
Start location, date and time. End location.
-
Step duration for isochrones in hours and minutes (12 hours for long routes, 1 hour for shorter)
-
For Time Step I generally start larger and once things are working, go smaller, the distance governs what the tme step is.
-
Divide the time expected to sail the course into 10 and use that number for the Time Step. Then adjust as needed.
-
Degree Steps (5 is faster than 1). Generally leave Courses (relative to true wind) alone, From 0 to 180 by 5 degrees is fine.
-
Boat Performance based on editing boat specifications or based on a polar data file.
-
Set constraints on various factors such as max wind, swell, waves, latitude, max diverted course etc…
-
Start Grib_pi and/or Climatology_pi
-
Set Grib_pi to the date and time you want to use.
-
Then go to the Weather_routing Config menu and pick “Grib Time”
-
Set options like detect land, currents, inverted regiions, anchoring.
-
Routes can be Edited (created, selected, renamed, reset and exported.)
Configuration and Edit Boat.xml,title="WR Configuration and Edit Boat.xml",width=600]]
16. View
-
Settings To eliminate the black lines of all Alternate Routes, in Settings you can set the alternate route thickness to zero.
-
Statistics
-
Report
-
Plot
-
Cursor Position
17. Use with Climatology
First job See 2. Setup Climatology as many of the samples included with Weather_Routing use Climatology. Don’t forget to Enable Climatology and under WR Configuration pick "Most Likely" for Climatology.
18. Use with Grib_pi
Boat position (round circle) is when stepping through the grib file (assuming you use a grib file and not climatology of course).
Moreover, if multiple routes are computed and shown (selected), when stepping through the grib the boat position is shown simultaneously on each route.
When you step through the grib you will see the boat position at that current grib time (not “the multipier of the two time intervals”). This can be right on an isochrone or between two isochrones (if grib interval is smaller than wxrte time interval).
19. Two Grib Files (Wind and Current)
Weather Routing will use two grib files that are loaded by Grib_pi. This is useful when you have downloaded a GFS Wind and Pressure Grib, and an RTOFS Current Grib of similar time period and resolution. First Load two Grib Files Concurrently (Wind and Current) in Grib_pi. Then in WR Configuration check the Currents box.
+ In this Baltic Sea example there is an underlying current file with black arrows and the area of the grib is shown in light read. The wind pressure grib is shown with brown arrows with feathers.
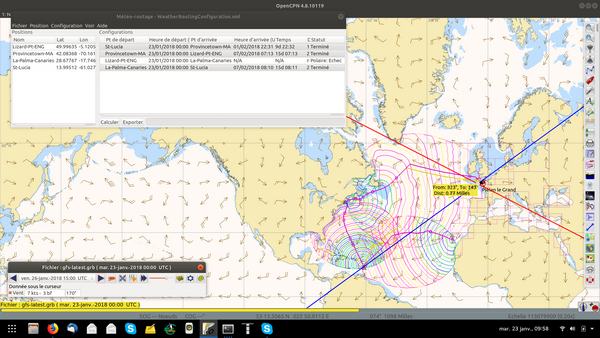
20. Use with Route Manager
The Route Manager can be used for listing the weather route. Right click a weather route and pick “Properties”. Also a Weather Routing can be Exported to a gpx file or saved to a Route in Route Manager.
21. Ocpn_Draw_pi (Boundaries with guid)
Create Boundaries recognized by Weather_Routing_pi. Boundary avoidance is useful for guiding the routing. Create a boundary in Ocpn_Draw, make sure it is visible and then in WR check "Detect Boundary" under Configuration Options
Red hatched Boundary along the Nova Scotia coast was created in Ocpn_Draw and used in weather_routing, to prevent routing in that area.
Red hatched Boundary created with Ocpn_Draw and used in Weather Routing Configuration > Options > Basic Tab > Check “Detect Boundary”
22. Irma Hurricane Examples
-
Hurricane Avoidance - Really understanding hurricanes is complex, let the software help you understand.
-
Sample files showing how time interval and max diverted course adjustments may help completion
-
Review the Irma Hurricane Examples page and download and install the example files.
Boat Performance Data - Polar Data
The plugin requires Boat performance data (polar data). The more accurate it is for the condition of the boat and seastate, the more accurate the routings will be. There are many Polar Data files included but Polar Data can be developed from:
-
Boat Instrument data created while sailing in current-free conditions. See
-
VPP Velocity Prediction Programs using the boat’s physical measurements.
-
Polar Data files are available in the Weather_routing Plugin. You select a starter polar file for your boat from within the plugin.
-
Yacht Devices using Excel: Case: How to plot a polar diagram for a yacht using data collected by Voyage Recorder
Note: Boat performance data should be in a format compatible with weather_routing_pi. The plugin will convert the file to a format that can be used (fixing certain minor variations and irregularities) or declare it unusable. The companion plugin Polar_pi also produces compatible polar files. Boat Performance Information Notes. The plugin may have a section with some rough VPP calcs which is not fully functional at this time. The manual does not cover use of these experimental sections. You are welcome to try them out.
Note: Gribs are dated predictive data, and will be subject to change over time due to the dynamic nature of weather. Generally data past 2-3 days is unreliable, and the longest grib available is 16 days (with larger time intervals between data points). For longer voyages, climatology_p provides a very useful 30 year average grib dataset.
Boat Performance Data - Outside Sources
Weather_Routing_pi has a full set of polar files, but there are other sources:
-
Distant Shores on Polar Performance Good advice, adjust VPP Polars for Cruising
-
Boat Performance Data - Polar Data. Record in consistent conditions for various conditions, see why.
Polar File Conversion
Sometimes a good polar is available for appropriate conditions, but it just needs to be converted for use in OpenCPN. Often this is automatically handled by Polar_pi or Weather_routing, but sometimes manual editing is necessary.
Polar File Conversion Examples
FAQ
Frequently Asked Questions is intended to answer questions that might arise.
Why does "Computation" fail?
Message "Polar:Fail"? It is very frustrating.
-
See: CF Thread Polar Fail
What can I do about "Polar:Fail"?
-
Add other polars to the boat file to cover those wind speeds.
-
Increase/Decrease the Interval, try 1-8 hr sometimes an alternate optimal route will appear.
-
Reduce Wind to 50% or 25%.
-
Increase Wind to 110% or 125%.
-
Use Boat.XML or Boat-Test.xml with TWS 0-60 knots.(original file, unchanged)
-
Use a different set of Polars.
-
Find the high or low wind area and times, then change the route accordingly.
-
Try a different grib file from another time with in the same area.
-
Zoom into where it fails and look. Near land can cause problems.
-
Try making a slightly new Destination point if it fails just short.
WR does not complete?
-
Undo the most recent changes you have made, if you had it working recently.
-
When this happens go back to basics, Reset to Configuration Default settings. See the CF Post about this and refer to the default list in this manual above. Or download the 4. Setup Weather Routing above, install it again and start over.
Routings not completing
with climatology only, seem to be missing voyage data, such as duration, time of start and finish If we are using a specific date and time for the start, why is this happening?
It is most likely that the routing did not reach the destination. -Understand that the routing ends if destination is inside two isochrones, which is likely what you have, but remember between these two isochrones the boat can only move in straight lines and if there’s land in the way, the destination could be unreachable. Islands and Harbors are very prone to this kind of issue.
Try a new destination (or start) well outside of the harbor. This issue occurs at both the start and the finish when the routing is tends to be near land with islands, harbors and complex shorelines, or try shortening the interval.
No red circle.
Why doesn’t synchronize position on route, display with grib display? Try uninstalling the weather_routing plugin and removing all files and configuration from the system as outlined in the manual then re-install and make a new configuration. Now you should see a red circle moving along the route as you step thru the Grib file.
What are the faint yellow line and the magenta line?
Edit Boat > Plot Tab What is the difference These are the optimum upwind and downwind lines for best velocity made good. The colors show up best with the left dropdown set on “Speed” rather than “Plot”
View > Route Position > Boat Speed
-
Boat Speed is shown as SOG and SOW when they are different. If they are the same, only one value is shown.
Time Intervals
When you step through the grib you will see the boat position at that current grib time. This can be right on an isochrone or between two isochrones (if grib interval is smaller than wxrte time interval).
Grib data Time Interval: Available in 3,6 and 12 hour intervals. Weather_Routing Time Interval: Often set to a smaller interval, say 3 or 1 hour intervals. But sometimes to complete to the destination the interval has to be set considerably smaller, say 10 minutes. Weather_routing will then interpolate the Grib file interval down to 10 minutes. When you try to step through the grib file to understand the conditions on the routing, you will jump across the interpolated isochrones. This is determined by the weatherrouting time interval.
For example: From the WeatherRoutingConfiguration results the arrival time is 21:33, for a departure at 12:00. This means a duration of 9 hours, or three grib intervals of 3 hours. Consistent with the 3 steps in grib controller (3 hour time intervals). If you have weather_routing time interval set to 10 minutes, the boat will skip over 18 isochrones for each step of the grib controller.
Eliminate black alternate routes?
View > Settings “Alternates for all isochrones” is unchecked and there are still black alternate routes showing. How do I eliminate them? Set alternate route thickness to “0” on the View > Settings menu.
Edit or move an existing WR Position?
Create a new position with the same name to replace it. There is then a prompt to overwrite the old location. This works from the context menu on the chart also.
How are Comfort Levels defined?
-
Three levels of comfort are defined: Green ("Good"), Orange ("Bumpy"), Red ("Difficult").
-
The comfort levels are based on wind speed, apparent wind direction and wave height.
-
More upwind ⇒ less comfort
-
The more the wind speed is above 27kts ⇒ less comfort
-
The greater the wave height ⇒ less comfort
Sean’s recallection as an Example: - 1 knot of current against 10 knots of wind gives bumpy factor of 1. - 2 knots of current against 20 knots of wind bumpy factor of 4. - 6 knots against 30 knots of wind is quite bad. (I did experience this a few times.) But this is simple and the wave height should be factored in somehow too. Conversely if the wind and current align it smooths the sea.
The "best" comfort calculation would consider: - Wave height, period, and direction relative to the boat; - COG and LWL and righting moment of the boat. - Righting moment can be measureed. Rock the boat and time sway from one side and back. - Key comfort factor is boat resonation in the swell pattern. - When swell timing equals or nearly equals the boat’s righting moment, causing resonance and amplification. - Factors: boat speed, wave period, the angle the boat travels relative to the waves all affect the timing of swells. - That timing across waves relative to the righting moment defines the comfort. - Increased wave height makes it worse. - Directly on the beam makes it worse. - Directly on the bow makes it worse and the righting moment is different on the bow (LWL and SOG could be used here). - On the bow the period and LWL to predict a likelihood of hobby horsing. - Wind hardly affects it at all, excepting that higher wind means the other factors will get worse in the future if they haven’t already. - To really figure it, you would do two comfort calculations, one relative to the beam, and one relative to the bow, and add them. - The calculations are not easy.
Is percentage upwind calculated?
Percentage upwind is calculated as the percentage of points on the route where the apparent wind is less than 90 degrees. Because points on the route are equally spaced in time, that means the percentage of time sailing upwind relative to apparent wind, which makes good sense.
Supplemental Hardware and Software
-
Voyage Recordings to create polars: Use Opencpn VDR_pi RPI3 or Yacht Devices Voyage Recorder
-
Yacht Devices using Excel: Case: How to plot a polar diagram for a yacht using data collected by Voyage Recorder
Warning
Data Weather_routing is only as good as the data provided by the Grib plugin and the Climatology plugin.
-
Grib plugin: Depends on recent download grib files from Noaa and other sources. Downloaded Grib predicitions can change significantly over several days. The longer the grib prediction is, the less reliable the grib can be.
-
Climatology plugin: Can be used for analyzing long cruising routes through various seasons and constraints, but does not take into account the current weather conditions which often vary significantly from the 30 year average, especially outside of prevailing wind areas.
-
These planning tools may be helpful, but should be taken with a healthy “grain of salt” as any good sailor (who looks out to the horizon) should know.
Weather Routes The weather routes created may not consider or “see” normal navigation considerations and issues, therefore every route should be checked very carefully for navigation markers, shallow depths, bad currents, rocks, land and other obstacles and hazards.
Developer Notes
Configuration of Installation files
Stelian wrote: In fact, the paths in WeatherRoutingConfig.xml and the boat XML files need to be there, because they tell the plugin where to find the corresponding boat/polar files. And since there might be several boat or polar names with the same name (but located in different folders), the paths need to tell which one is to be used.
However, there is one exception to this: at the packaging time, we don’t know where the files will be installed - we know we want to put these in the user directory (ProgramData), but this path is dynamic, it depends on the user name (in case of multiuser systems). For example, on Linux, it might be /home/stelian/.opencpn/plugins/… or /home/rick!
So what we’ve done is to change the code to allow the config file to use name without the path. The plugin, when it tries to open the file and if there is no path before, will automatically append the user directory path. This is why the xml files containing the default configuration need to have only the filenames and not the paths inside.
Moreover, the files can contain the path to the contours. This path, once again, is dependent on the user. So we’ve just removed the CrossOverContours from the boat xml files, and made sure that the plugin will regenerate the contours upon start.
For the date problems, well, we simply noticed in the XML file that the dates were in mm/dd/yy format, so I’ve just modified them to yyyy-mm-dd, (if you had saved the files using the current version of the plugin this should have been done automatically).
There was an hour issue too, the file had 09:00 (local time I suppose), I put 00:00:00 instead, I don’t think it matters much anyway for such long routes.
I also renamed a boat.XML file to .xml (notice case), it’s more standard that way (I know that windows doesn’t care much, but on the other systems the conventions are quite strong).
Notes New dialog to display which sail plan is at the cursor in View→Cursor Position. Alternately it might be interesting to have a display option to color the route map the same as the cross-over chart. There is a box on the route to show each sail change.
Author
Weather_routing_pi programming by Sean D`Epagnier Sean’s Website