WATCHDOG: Navigation Alarms

Developer: Sean D’Epagnier
Maintainers: Rick Gleason, Jon Gough, Roel Smidt and the Plugin Team
PI Manager Workflow: Testplugin
Version & Changes
Watchdog v2.4.44 for OpenCPN v5.4.2 was updated March 2021 and requires Opencpn v5.0.0 or newer. This plugin now works with the new Plugin Manager (PIM) integrated installation for multiple environments.
Links
Source: https://github.com/seandepagnier/watchdog_pi
Maintained Source: https://github.com/rgleason/watchdog_pi
Packaged Releases: Github Releases
Forum: Cruiser’s Forum Watchdog Thread
Downloads: https://opencpn.org/OpenCPN/plugins/watchdog.html
Current OpenCPN Downloads Page: https://cloudsmith.io/~opencpn/repos/
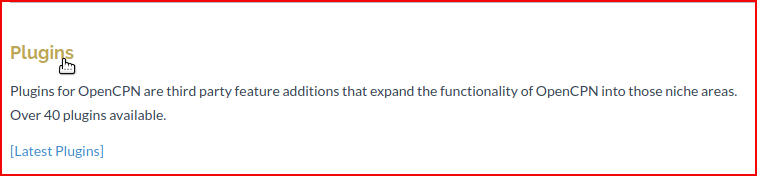
What is Watchdog (WD)?
Watchdog Plugin (WD) implements various configurable alarms for changing conditions.
Watchdog communicates with another very useful plug-in, called Ocpn_Draw. Ocpn_Draw (OD) is used to draw points, lines and shapes, guard zones and boundaries which can be used in navigation to show
-
Electronic bearing lines (EBL)
-
Variable range markers (VRM)
-
Specific points (Boundary-points)
-
Specific areas (Boundaries)
-
Special boundary which moves with the boat (Guard Zone)
These features of Ocpn_Draw (OD) must be made using Ocpn_Draw, so they can be used in Watchdog. Watchdog can alert you when your own ship
-
enters (or gets too close to) or
-
leaves (or gets too far away from)
one or more of these stationary Boundaries. Watchdog can also provide an alert when another ship (AIS-target) enters a Guard Zone Boundary(moving with your ship). Watchdog and Ocpn_Draw work together using boundary identifiers called GUID to provide some very useful alarms.
Watchdog will be referred to as "WD".
Ocpn_Draw will be referred to as "OD".
The plugin was originally named "Watchman" but was later renamed to "Watchdog" which might seen in some screens and menu’s.
Installation
Using Plugin Manager (PIM)
Watchdog is available as a managed plugin (PIM), which is the easiest way to install the plugin. The OpenCPN Manual has general information in Plugin Download, Install and Enable for installing this plugin. This is the preferred way.
In OpenCPN, go to the Options → Plugins and download, install and enable the Watchdog plugin.
-
In OpenCPN Click Tools-Options-Plugins
-
First "Update" the master plugins catalog.
-
Select the Watchdog entry and "Install" the plugin.
-
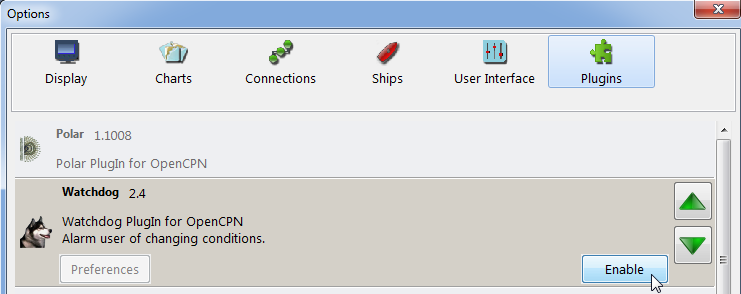
In the list of installed plugins "Enable" the Tactics plugin and "Apply".
-
Use “Preferences” to set your preferences (should be self-explanatory). Then “Apply.
-
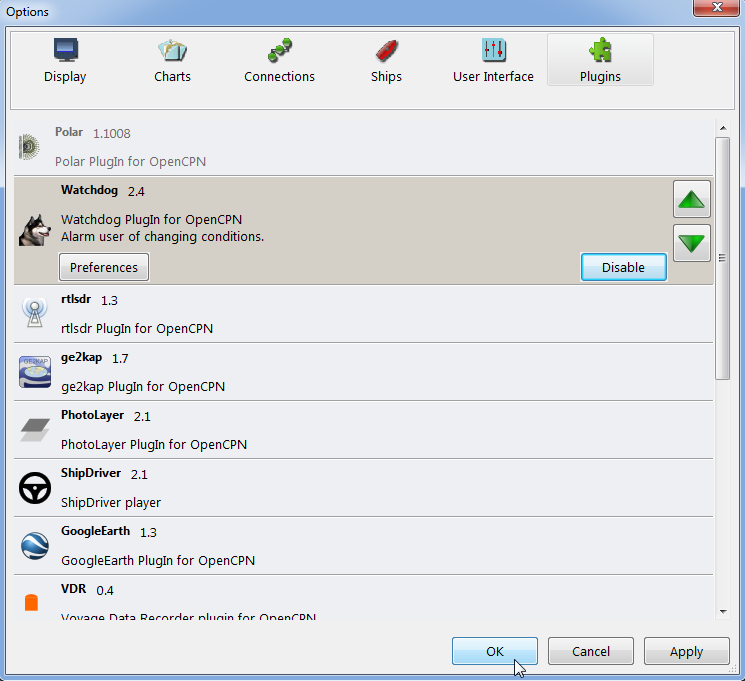
After successful installation, the plugin should be available in the plugins tab of your OpenCPN options dialog box.
-
Then close Options and the Watchdog Icon should appear in the Toolbar.
Use Plugin Package Installer (PI)
The second way is to download a PI Package Installer (Windows .exe, Linux .deb or MacOS .pkg) from the OpenCPN website, to download Watchdog

Then Click "Downloads"
These instructions are specifically for WD-pi, however the OpenCPN Manual has more general information using this older method in Plugin Download, Install and Enable.
Click "Plugins for OpenCPN 4.2 and up"
Scroll down to the "Safety" section and click "WatchDog"
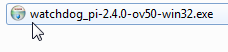
Choose the file compatible with your computer. These examples are for Windows, so we choose the Windows setup-package. Download the file (double-click).
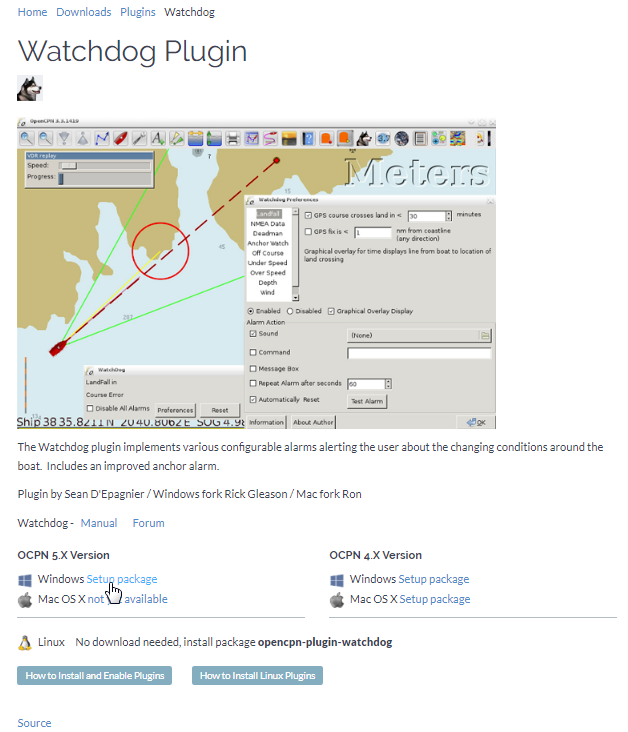
Install the Package
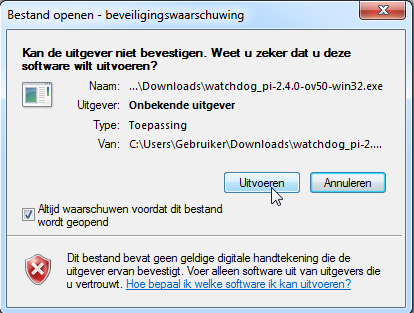
It’s better to close OpenCPN before installing WD-pi. We assume you know where to find the files you download from the Internet. Open the downloaded Plugin Package Installer (watchdog_pi[version].exe) and install the plugin following these screenshots (don’t mind the dutch).
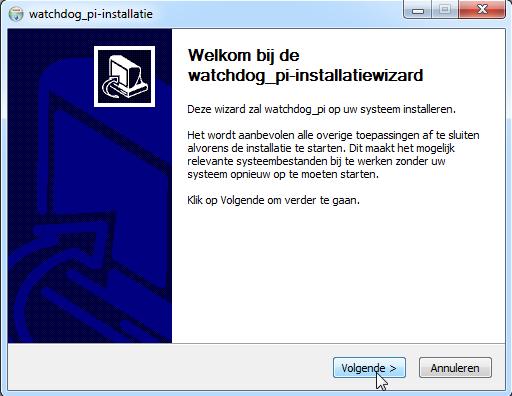
Accept the license terms and install the plugin. Then before using WD-pi enable the plug-in.
A. What does WD do?
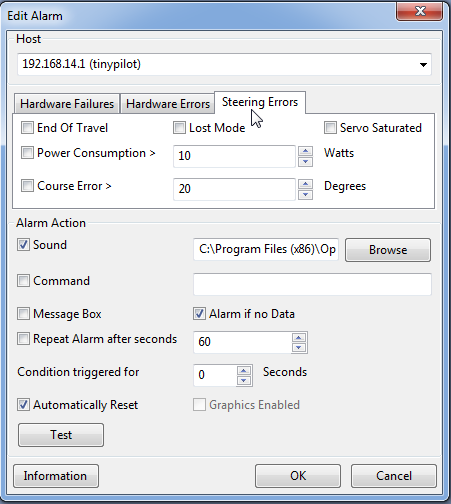
Watchdog warns you -in specific situations- when you want to be warned. Watchdog has the following alarms:
Landfall Alarm
Boundary Alarm
GPS Course Cross Boundary Alarm
GPS Fix NM from Boundary Alarm
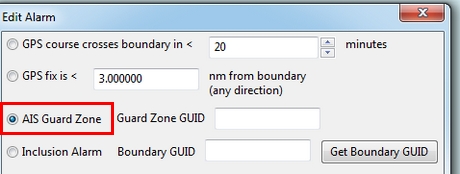
AIS GUARD & Inclusion
Guard Zone Alarm
Anchor Alarm
Course Alarm
Speed Alarm
Depth Alarm*
Wind Alarm*
Weather Alarm*
Pypilot Alarm*
Deadman Alarm
NMEA No Data Alarm*
Email Alert
New alarms are noted with an asterick *
B. How can WD alert me?
Does it bark? Yes, that is possible. But maybe you want to choose something else.
You can set an alert in the form of a text-message that pops up on your screen …. (in the pop-up screen there’s still evidence of the original name Watchman..)
A text-message is rather useless if you are not looking at your display. The Deadman alarm prevents the watchman from falling asleep (or wakes up) so this alert is logically a loud noise. So Watchdog also enables you to set an acoustic alarm.

You can use any sound you like, as long as it is a ".wav" file.
Examples:
If you want to brush up on your Morse-code, you can set Morse-code YYY (Yankee = "My anchor is dragging") as sound for anchorwatch-alarm and Morse-code UUU (Uniform = "You are running into danger") as the sound for Boundary and Land-fall-alarm.
You can generate these sounds yourself dead-simple on the website Morse Code Translator.
Just type whatever you want, adjust pitch and speed to your liking and save as .wav files in /OpenCPN/sounds).
If your only reaction to hearing the beeps of Morse code is "Ah, the pizza in the microwave is ready!" then maybe a more direct approach suits you better. Perhaps a computer that actually says "Warning! Boundary!" when the Boundary-alarm sounds and "Warning! Anchor!" when your anchor is dragging.
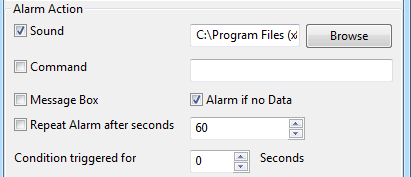
Play WD Warnings with "Sound" checked
In a "Edit Alarm" Menu browse to '%localappdata"\watchdog_pi\data\Warnings\Warning Boundary.wav'
%localappdata\opencpn\plugins\watchdog_pi\data\Warnings
OR
C:\Users\Rick\AppData\Local\opencpn\plugins\watchdog_pi\data\Warnings
and pick an appropriate Warning. Then "Test" to confirm the path is correct.. _ _
Play WD Warnings from Command
Use a sound command line utility to play sound files. Another way to play Watchdog Warnings with "Sound" unchecked and "Command" checked. Then try these examples using Powershell for Win OS:
powershell -c (New-Object Media.SoundPlayer 'C:\Program Files(x86)\OpenCPN 5.2.4+6b314e6\sounds\2bells.wav').PlaySync();
OR
powershell -c (New-Object Media.SoundPlayer
'C:\Users\Rick\AppData\Local\opencpn\plugins\watchdog_pi\data\Warnings\Warning\Boundary.wav').PlaySync();
The paths are:
%localappdata%\opencpn\plugins\watchdog_pi\data\Warnings\
and then [add the appropriate filename] OR
C:\Users\[user]\AppData\Local\opencpn\plugins\watchdog_pi\data\Warnings[appropriate file name]

If you really want a Watchdog that barks, then find a wav-file of a barking dog, it might start every dog nearby to join in. Apart from pop-up screens and all kinds of sounds, you can also let Watchdog execute a computer command. That can be any computer command. To name just a few options: Start a pdf-document with pre-defined messages in "Seaspeak" or any other language you need to have a conversation with the skipper of that monstrosity that is About to collide with you.
Or imagine your boat anchored in the bay and you sitting ashore in the pub….. And hey, on our mobile phone we receive an email from a loved-one!
How this email-trick is done, is explained in "Email Alert to yourself" at the end of this manual.
C. Typical Setup of Alarm
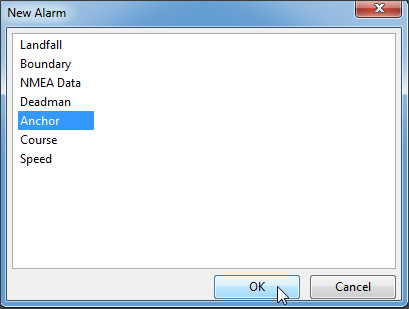
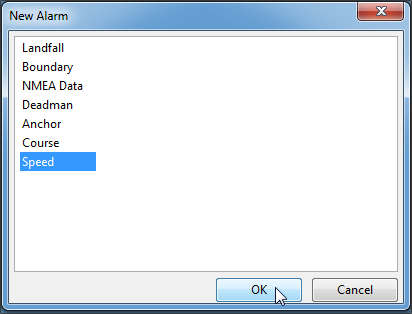
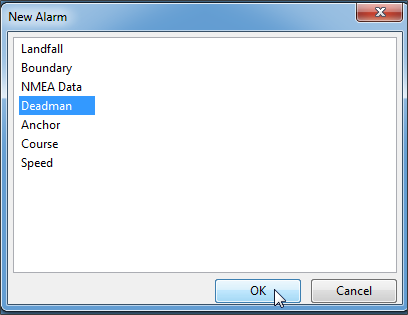
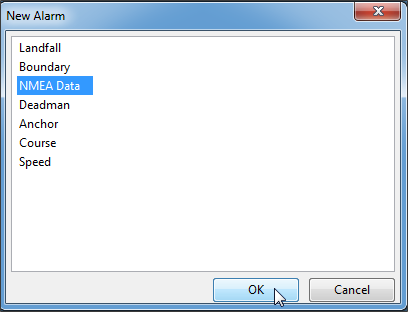
When Watchdog is installed and in the OpenCPN Toolbar, follow these 4 initial steps to set up a new Watchdog Alarm:
Step 1. Click "Watchdog" in the OpenCPN Toolbar*
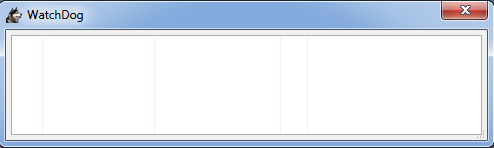
Step 2. The "Watchdog Window" opens. If no alarms are set, it will be a rather empty screen.
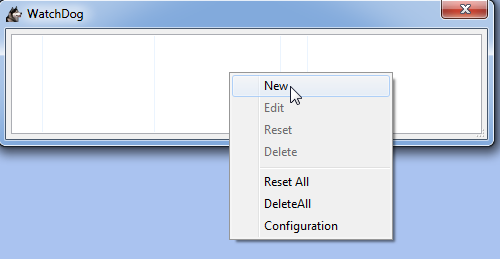
Place the cursor in that empty screen. A mouse-click will give you a pull-down menu.
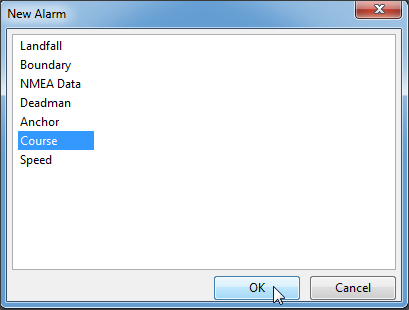
Step 3. Click "New"
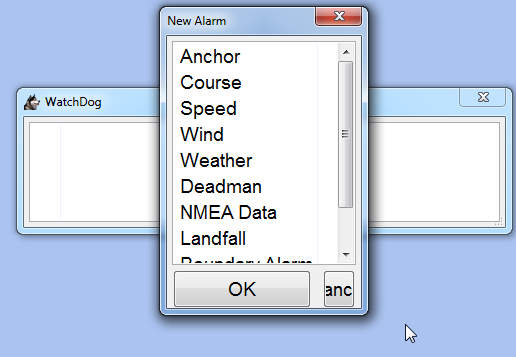
Step 4. The "New Alarm Window" opens. It shows the various types of alarms.
Note: This window might still have a small bug. I cannot adjust it’s size and so the text in the “Cancel”-button is just “anc”…..
This manual was written with the Windows-version of OpenCPN and Watchdog. In Linux Mint it works better. In the Linux-version of OpenCPN and Watchdog you can adjust the size of the window so that all options are shown.
(The next steps involve clicking the desired alarm and clicking "OK") NOTE: These 4 initial steps are the same for each alarm. In the rest of this tutorial these steps will not be repeated but will be referred to as "set up a new Watchdog-alarm".
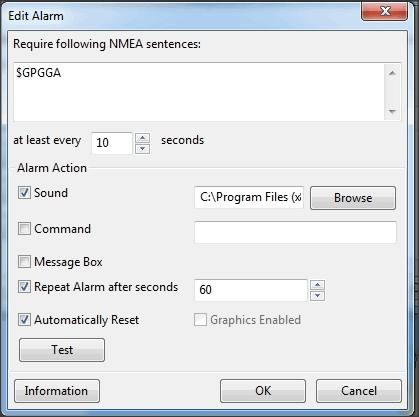
D. Typical Setup of Alarm Details
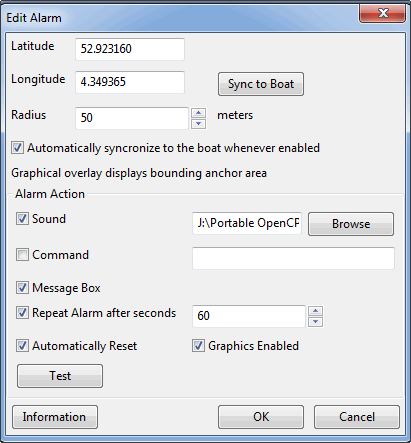
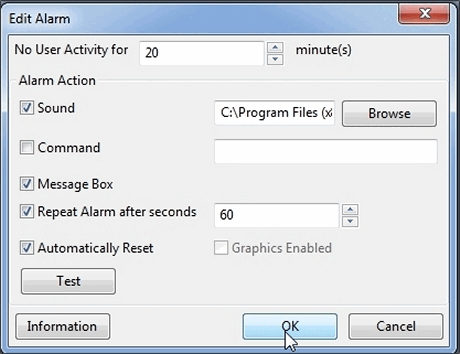
When setting up a new Watchdog-alarm, you will come across the “Edit Alarm” window.

In that window there is a part (normally the uppermost part) that is specific for that type of alarm, but there is also a part that is the same for every type of alarm. It is the “Alarm Action” part.
Important:
In several alarms you’ll see in the "Alarm Action" part a checkbox “Alarm if no Data”. That is because most WD-alarms are based upon information (“data”) your computer is getting from other devices. For instance: GPS for position, speed and course, digital wind-sensor, digital sensors for air-pressure, temperature and humidity,an AIS-receiver or transponder etc.
If that box is checked, the alarm will be activated when the data-stream is interrupted.
For instance: anchor alarm is set to be activated when you drift more than 50 metres from your position. Your position is given by your GPS-receiver. If the “Alarm if no Data” - checkbox is checked and the GPS stops working, the alarm will be activated, even if your ship hasn’t drifted at all.
That checkbox is an important safety-feature because it will warn you when one of your instruments has gone on the blink and has stopped sending it’s information!
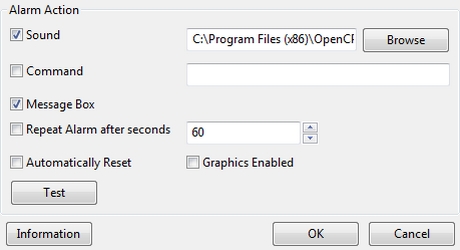
In the Edit Alarm-window you can tell Watchdog what you want it to do. A brief explanation:
Sound
Alert you by playing the soundfile (.wav-file) you have entered (use the
“Browse” button to point WD to that file).
Command
Execute a computer command (type the command in the box next to
“command”).
Message Box
Show a pop-up Textbox with “ALARM”.
Repeat Alarm after seconds
Gives the opportunity to order WD to repeat the alarm after a set time
(in this example that time is set to “60 seconds”).
Automatically Reset
Means that when the alarm is triggered, the alarm will be reset to await the next “cause for alarm”.
Graphics Enabled
Means that WD will show you something on screen, relating to the alarm.
For instance the radius of the anchor-alarm you have set.
Test
Means that you can test if the alarm works yes or no.
Information
Means that … well, try that button for yourself and you’ll see.
If you do not understand the function of the buttons “OK” and/or “Cancel”: sell your computer!
First the various types of alarms are briefly explained. After that each type of alarm is explained in (a bit) more detail.
E. ALARM SUMMARY
Short Alarm Descriptions below.
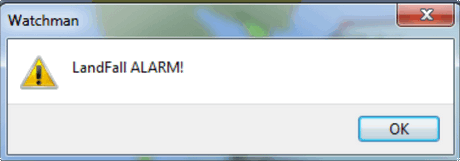
Landfall Alarm
Landfall Alarm alerts when own ship nears land. Most useful for long voyages with vast stretches of water. More extensive description of the alarm LANDFALL ALARM.
Boundary Alarm
See also Plugin Messaging between ODraw, Watchdog and Weather_routing. Boundary Alarm alerts when own ship’s position relative to a Boundary is not within ranges set or when about to sail into a "restricted area".
The manual for Boundary Alarm is a bit more complex than the other sections. That is because:
-
there can be different types of boundaries (made with the plugin O-DRAW) and
-
there can be different types of boundary-alarms (made with WATCHDOG).
With Watchdog you can make 4 different types of boundary-alarms:
-
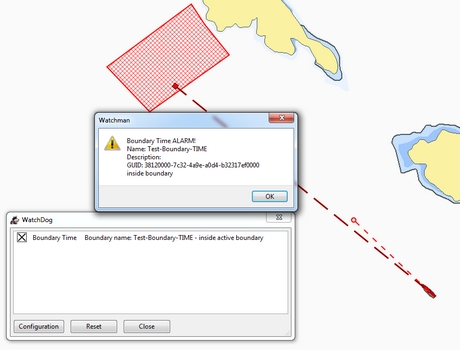
GPS course-alarm warns when course and speed will cross the perimeter (border) of a boundary in less than the specified time.
In this manual this type of alarm is also referred to as "Boundary-time". -
GPS fix-alarm warns when position from the perimeter (border) of a boundary is less than the given distance.
In this manual this type of alarm is also referred to as "Boundary-distance". -
Inclusion-alarm warns when own ship is outside a given boundary.
-
AIS Guard Zone-alarm warns when other ships are inside a given boundary.
Boundary-alarms of the type GPS course, GPS fix and Inclusion are related to the position (and speed and course) of your own ship and are fed by the data from your GPS receiver.
Note: "Inclusion Alarm" might be a bit confusing because "inclusion" means "beïng inside or included in a boundary".
The "Inclusion Alarm" is not intended to alarm when own ship gets inside a boundary. On the contrary, it is intended to alarm when own ship gets outside the boundary.
In earlier versions of Watchdog this alarm was called "Anchor Watch Boundary GUID".
But as Watchdog also has a dedicated "Anchor Watch" alarm, the name was changed into "Inclusion" Alarm.
To avoid "inclusion-confusion" 8-O , just keep in mind that the "Inclusion Alarm" is keeping an eye on you to make sure your "own ship" stay "included" in the boundary."
The more extensive description of the alarm is here: BOUNDARY ALARM.
GPS Course cross Boundary Alarm
This alarm will be triggered when course and speed will bring you in less than (user defined) minutes to a boundary. The more extensive description is here: GPS COURSE Cross Boundary.
GPS Fix NM from Boundary Alarm
This is an alarm when the ship reaches a user specified distance (NM) from a Boundary. The more extensive description is here: GPS FIX NM from Boundary.
AIS Guard Zone & Inclusion Alarm
A Boundary alarm of the type AIS Guard Zone is triggered by the data from other ships, as received by your AIS receiver.
The difference with the "normal" AIS alarm (warn me when a ship comes within a given distance from "own ship") is that the Watchdog Boundary Guard Zone alarm gets triggered when a ship enters a specific area (like for instance the entrance to that secluded spot you thought to have for just you and your spouse/friend/secretary/…). The more extensive description of the alarm is here: AIS GUARD & Inclusion.
Dynamic Guard Zones
Note: in Watchdog you can set a "Guard Zone" alarm but in O-Draw you can also create a "Guard Zone". A Guard Zone in O-Draw is a special kind of area that is not static, but moves with your own ship. The more extensive description is here: DYNAMIC GUARD ZONES.
Anchor Alarm
Anchor Alarm alerts when your position changes more than a specific distance from a certain position (when your anchor is dragging). The more extensive description of the alarm is here: ANCHOR ALARM.
Course Alarm
Course Alarm is alerts when "own ship" gets off course. The more extensive description of the alarm is here: COURSE ALARM.
Speed Alarm
Speed Alarm alerts when boat speed drops below a set speed (Underspeed) or when boat speed has increased above a set speed (Overspeed), both can be problematical. The more extensive description of the alarm is here: SPEED ALARM.
Depth Alarm
Depth alerts when depth is less than a user set depth. The more extensive description of the alarm is here: DEPTH ALARM.
Wind Alarm
The wind-alarm can be set to warn when the windspeed exceeds a given value, drops under a given value or changes direction. The more extensive description of the alarm is here: WIND ALARM.
Weather Alarm
Weather-alarm alerts when there are changes in barometric pressure, air temperature, sea temperature, relative humidity and humidity. Which helps to decide what to wear, foul-weather or bathing suit, and of course to decide when to head for a safe haven. The more extensive description of the alarm is here: WEATHER ALARM.
Pypilot Alarm
The Pypilot-alarm alerts when something is wrong with your automatic steering gear (autopilot), driven by the Pypilot plugin. The more extensive description of the alarm is here: PYPILOT ALARM .
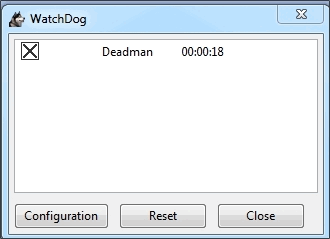
Deadman Alarm
Deadman Alarm alerts when there is no keyboard activity (fallen asleep, jumped overboard or simply passed away). The alert occurs after a given amount of time the program still has not experienced any input, to be sure there is still someone on watch. The Deadman alarm stops as soon as any user action is taken, for instance a movement of the cursor (mouse). The more extensive description of the alarm is here: DEADMAN ALARM.
NMEA Data Alarm
NMEA Data Alarm alerts hen OpenCPN loses NMEA-input. NMEA-data is information the program receives from various instruments. Most well-known NMEA-data is from GPS receivers and AIS receivers. NMEA Data Alarm is crucial if you want to rely on instruments for position, course and speed or AIS! In short: if NMEA input is lost a significant part of OpenCPN is lost. The more extensive description of the alarm NMEA DATA ALARM.
Email Alert
For any of the alarms, send an email alert. EMAIL ALERT.
ALARMS
1. LANDFALL ALARM
Landfall-alarm is meant to alert you when you get within a set distance from land. For most sailors the usefulness of such an alert is obvious.
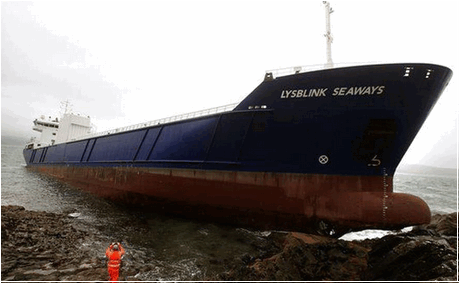
"Hoorah and up she rises!" More info: go to "MAIB" and search for "Lysblink Seaways".
Important: the alarm operates in relation to the coastline as it is programmed into your vector charts! OpenCPN comes with a worldwide background map, displayed if no charts are available for an area. Note: these two screenshots illustrate that the coastline in that basic background map can be quite different from the real thing! Looking at this basic coastline chart WD will assume we are not close enough to the coastline to trigger the Landfall alarm. So, WD stays quiet.
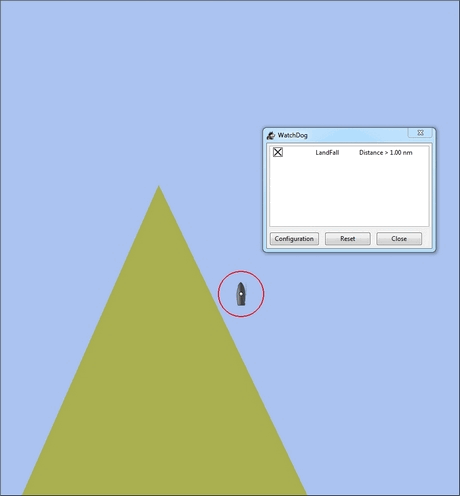
When he really should have barked!
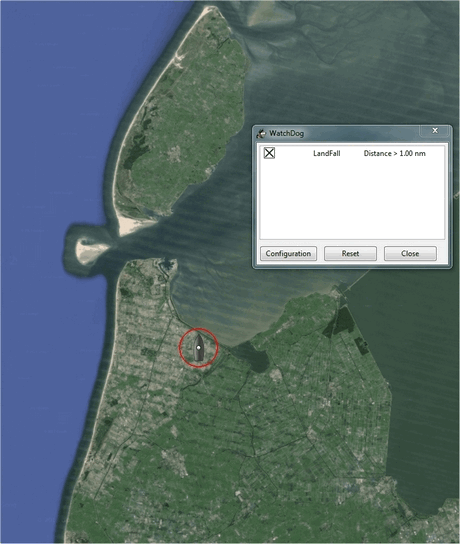
Therefore it would be advisable to use the 224mb(unzipped), most detailed, GSHHS High Resolution Background Map. It can be downloaded using the Chart Downloader
Stay on the safe side and set landfall-alarm for a distance well offshore. Landfall-alarm is not meant for close-quarters navigation.
Setting the Landfall-alarm is explained step-by-step by these screenshots. Set up a new Watchdog-alarm and pick "Landfall".

Click "OK". The "Edit Alarm" window pops up. In the Edit Alarm window you can choose between "GPS course crosses land in less than … minutes" or "GPS fix is less than …. nm from coastline". Here we’ve chosen "GPS fix is less than 5 nm from coastline". Tick the rest of the boxes and click "OK".

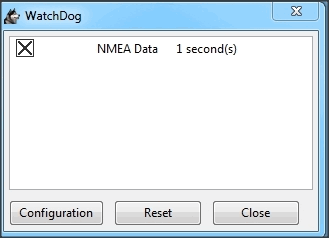
The Watchdog Configuration window shows the alarm.
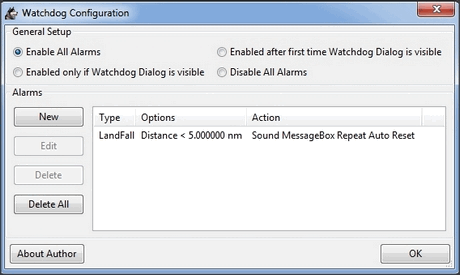
Now your Landfall alarm is ready to be used.
Just make sure the "Alarm On/Alarm Off" box is ticked (set).

2. BOUNDARY ALARM
Watchdog communicates with another very useful plug-in, called "OpenCPN ODraw Plugin". That plugin is a tool to draw geo-referenced points, lines and shapes within OpenCPN. These points, lines and shapes can be used in navigation, for instance to show specific points or areas (Boundaries), electronic bearing lines (EBL) and variable range markers (VRM). Watchdog will be referred to as "WD-pi" or "WD". OpenCPN Draw Plugin will be referred to as "Ocpn-Draw", "ODraw-pi" or "OD".
This section of the Watchdog-manual is a bit more complex than the other sections because:
With O-DRAW you can make 4 different types of boundary.
-
Boundary-type "inclusion"
-
Boundary-type "exclusion"
-
Boundary-type "neither"
-
Guard Zone a special kind of boundary:
With WATCHDOG you can make 4 different types of Boundary-alarms.
-
GPS course crosses boundary in less than … minutes
-
GPS fix is less than … nautical miles from boundary
-
Inclusion Alarm, Boundary GUID …..
-
AIS Guard Zone, Boundary GUID …..
There can be several combinations of boundary type and boundary alarm.
Before we continue, an explanation of these 4 different types of alarms is needed.
-
GPS course-alarm warns you when your course and speed will make you cross the perimeter (border) of a boundary in less than the specified time. In this manual this type of alarm is also referred to as "Boundary-time".
-
GPS fix-alarm warns you when your position from the perimeter (border) of a boundary is less than the given distance. In this manual this type of alarm is also referred to as "Boundary-distance".
-
Inclusion-alarm warns you when you are outside a given boundary (a bit like "Anchor Alarm").
-
AIS Guard Zone-alarm warns you when other ships are inside a given boundary.
WD and OD are independent plugins but the two can work together by passing and receiving messages.
For the alarms, when WD needs boundary information, WD asks OD, via a message, whether a Lat/Lon is inside a boundary. WD can add further requirements asking for boundaries in a particular state and a particular type. Both the state and type are the same as what OD uses, i.e. Active/Inactive and Exclusion/Inclusion/Neither, or the inclusive "Any" (meaning any type and/or any state, not being as selective).
Boundaries & Guard Zones
To fully benefit from the capabilities of the WD Boundary Alarms, we need to understand the "Boundaries" made by OD. For a full explanation, see the Ocpn-Draw_pi in the manual.
You can create Boundaries in (OD) Ocpn_Draw_pi (not Watchdog) by clicking "Create Boundary" and Guard-Zones by clicking "Create Guard Zone", explained in the Draw-pi section of this manual.

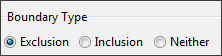
Boundary Types
In Ocpn_Draw_pi (OD)
-
Create a boundary
-
In "Boundary Properties" tab, assign a "Boundary Type" to each Boundary or Boundary Point (BP)
-
Choose "Exclusion", "Inclusion" or "Neither"
In WD set the alarm type for every kind of boundary.
-
Set alarms that are triggered when own ship gets too close to a boundary of type "Exclusion",
-
Set alarms triggered when own ship gets too close to an "Inclusion" boundary or a "Neither" setting.
The most logical boundaries use is
-
"Inclusion" boundaries are like a play pen, "OK to be inside",
-
"Exclusion" boundaries are fencing an area out and "not OK to be inside"
-
"Neither" boundaries are just good to be alerted when crossed.
The message from each type of boundary is:
-
Exclusion "Don’t come near or inside." BOAT KEEP OUT
-
Inclusion "Stay inside." KEEP BOAT INSIDE.
-
Neither Location is not important, Alert when crossing is important.
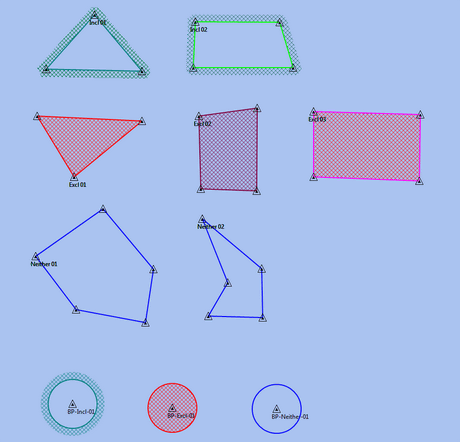
Each Boundary Type is graphically represented in a specific way.
-
Exclusion: a hatched pattern inside the area.
-
Inclusion: a hatched zone on the outside of the boundary.
-
Neither: no hatch (just a line).
Boundaries can be any shape, size and color you like, for color its logical to use red ("danger") for boundaries of the type "exclusion" and something green("safe") for boundaries of the type "inclusion".
This screenshot shows the different types of boundaries.
-
Top row: two boundaries of the type "inclusion"
-
Second row: three boundaries of the type "exclusion"
-
Third row: two boundaries of the type "neither"
-
Fourth row: three boundary points. From left to right, "inclusion", "exclusion"and "neither".
3. GPS COURSE Cross Boundary
Setting up a "GPS COURSE CROSSES BOUNDARY IN < ….MINUTES" ALARM
-
Set up a new Watchdog-alarm and pick “Boundary”.
-
Select "GPS course crosses boundary in < …. minutes"
-
Edit the alarm so that the alarm will be triggered when course and speed will bring you in less than (your choice) minutes to a boundary.
-
You can set the time between 0 and 1000 minutes. 0 minutes is quite useless and 1000 minutes (more than 16 hours) is maybe a bit much.
-
In this example we have used 20 minutes.
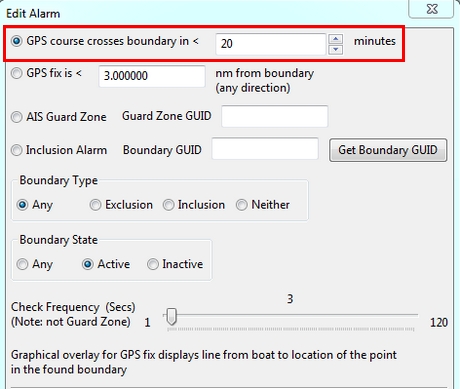
In the Watchdog "Edit Alarm" window, you can select "Boundary Type" and "Boundary State".
In this example "Any" and "Active" are ticked.
The result is that the alarm will look at all active boundaries, no matter what the type is.
Regarding the type of the boundary: If you’d like the alarm to react to
* any boundary, no matter what the type is, select "Any".
* only to boundaries of the type "Exclusion", select "Exclusion".
* only to boundaries of the type "Inclusion", select "Inclusion".
* only to boundaries of the type "Neither", select "Neither".
Regarding the state of the boundary: If you’d like the alarm to react to
* any boundary, no matter what the state is, select "Any".
* only to active boundaries, select "Active".
* only to inactive boundaries, select "Inactive".
Note: as from WD version 1.9025 the "Edit Alarm" window for Boundary alarm also shows a slider to allow the user to select the frequency of checking.
It defaults to 3 seconds (the current Watchdog default), but can be set from 1 to 120 seconds. The longer the check the better for low powered machines.
Don’t forget to set the Alarm Actions ("Sound", "Message Box" etc. as described in "Standard actions: Setting up the Alarm Actions").
Click "OK".
To illustrate the working of the alarm, in this example we have set the COG Predictor Length to 20 minutes (via Options-Ships-Own Ship-Display Options).
As long as we are more than 20 minutes away from a boundary, Watchdog will remain silent.
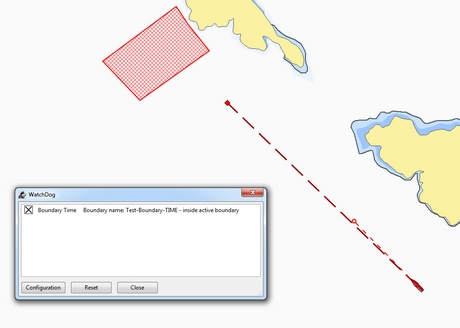
But as soon as we are less than 20 minutes away from a boundary, the alarm will be triggered.
4. GPS FIX NM from Boundary
Setting up a "GPS FIX IS < …… NM FROM BOUNDARY" ALARM
-
Set up a new Watchdog-alarm and pick “Boundary”.
-
Select "GPS fix is < …..nm from boundary"
-
Edit the alarm so that the alarm will be triggered when the GPS fix indicates that the boat is less than the minimum distance from a boundary.
-
Entering a distance of "0", the alarm will not work because that is "a distance of less than 0 nm"
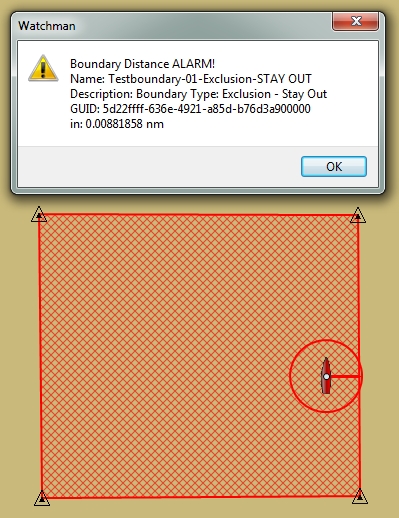
In this example we have chosen 0.01 nm (18,5 meters) to a boundary ("GPS fix is < 0.01 nm from boundary).
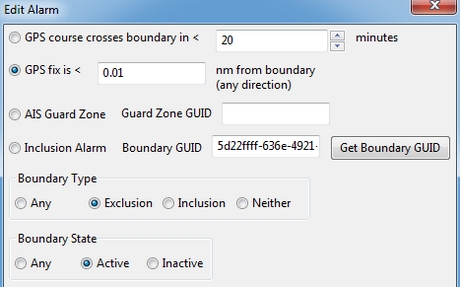
Note: In this example we have a boundary of the type "exclusion" (a hatch-pattern on the inside). In the Watchdog "Edit Alarm" window, you can select "Boundary Type" and "Boundary State".
In this example "Exclusion" and "Active" are ticked with the result that the alarm will only consider "Exclusion" and "Active" boundaries.
(See also the previous section ("Setting up a GPS course crosses boundary in < …. minutes") for the effects of ticking the different "Boundary Type" and "Boundary State"-buttons).
Don’t forget to set the Alarm Action and click OK.
Now lets see if it works….
As long as the distance to a boundary is more than 0.01 nm, the alarm remains silent.
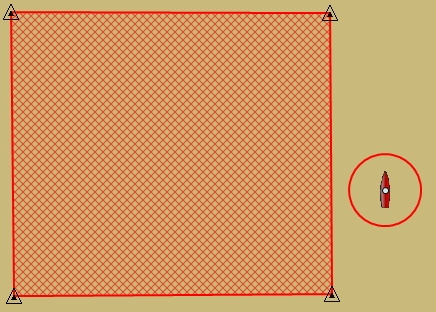
But as soon as we get within a distance of 0.01 nm of a boundary, the alarm is triggered
The alarm will also show the name and description of the boundary you are getting too close to.
For this example that name is "Testboundary-01-Exclusion-STAY OUT".
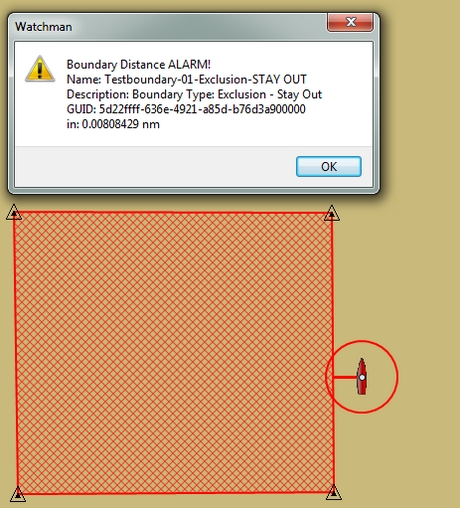
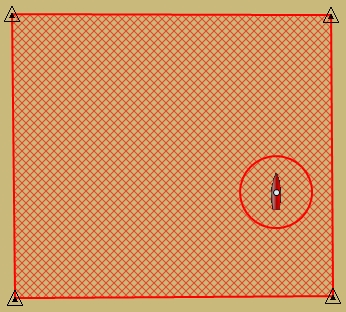
This goes also for the inner side of the boundary.
Closer than 0.01 nm from the boundary perimeter? Alarm.
More than 0.01 nm from the perimeter?
The alarm stops.
Watchdog did warn you, but if you still decide to go on, she (yes, Watchdog is a bitch…. ;-) ) will assume that you know what you are doing.
5. AIS GUARD & Inclusion
A Boundary alarm of the type “Inclusion Alarm” is meant to alert you when your own ship gets outside a specific boundary. The alarm is related to the position of your own ship and is fed by the NMEA-data from your GPS receiver.
A Boundary alarm of the type “Guard Zone” is meant to alert you when one or more other ships are inside a specific boundary. “Guard Zone” is related to the position of other ships and is fed by the NMEA-data from your AIS receiver. "Guard Zone" will also be shortened to "GZ".
NOTE: “other ships” are only ships that actually transmit AIS data and whose AIS-data are actually received by your AIS receiver! Ships that do not transmit AIS-data (or AIS-data your AIS receiver does not receive) are not “seen” by WD!
Keep this in mind, especially as you might encounter ships that should send out AIS-signals, but don’t do so because their transmitter is switched off on purpose (like fishing vessels that want to keep their favourite fishing tracks hidden from others!)
GUID’s
To let Watchdog know what specific boundary it has to guard, you have to specify the “GUID” of that boundary. GUID stands for “globally unique identifier” and is a unique reference number used as an identifier in computer software. GUIDs are displayed as 32 hexadecimal digits with groups separated by hyphens.
Example: 2a980000-5098-4787-ac4f-e05b47e7ffff
To enter the GUID of a Boundary or BP in WD, you place your mouse-cursor on a boundary, do a right-mouseclick and copy the GUID. Then, in the Watchdog Edit Alarm-window, you can paste the GUID in the field Boundary GUID or Guard Zone GUID.
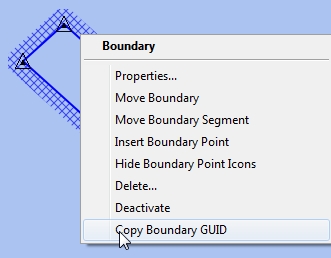
Make sure you do "Copy GUID" before editing the Watchdog Alarm.
Alternatively, when the “own ship” icon is within the boundary, you can click “Get Boundary GUID”.

Note: this method does not always work. In such cases: use the “copy-paste” method.
Setting up a Boundary AIS Guard Zone Alarm
Set up a new Watchdog-alarm and pick “Boundary”.
Select “AIS Guard Zone”
Edit the alarm so that the alarm will be coupled to the boundary you want to be guarded.
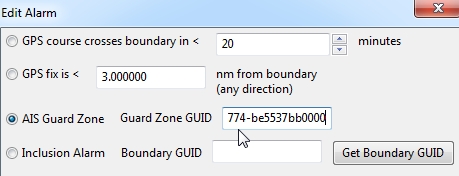
Don’t forget to set the Alarm Action and click OK.
Now lets see if it works….
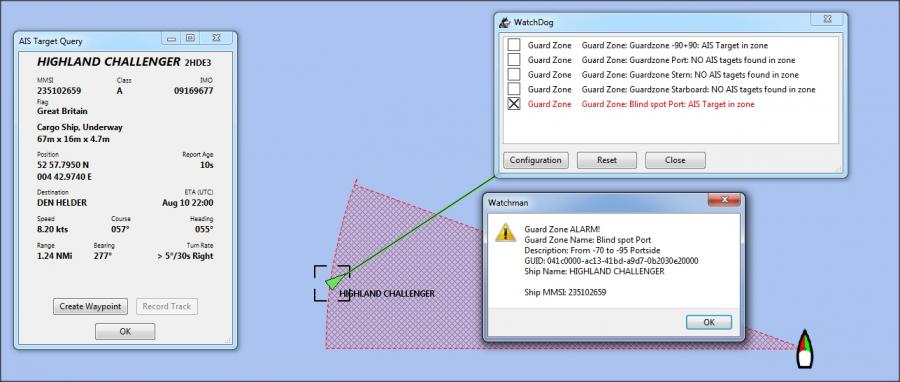
As soon as the feed from your AIS receiver shows that an AIS-target (=“another ship”) enters the specified Guard Zone Boundary, the alarm gets triggered. The other ship (green icon) is not (yet) in the Guard Zone Boundary: alarm not triggered (yet).
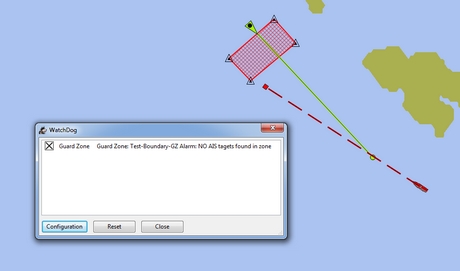
The ship enters the Guard Zone Boundary: Guard Zone Alarm is triggered (and shows ships name and MMSI-number).
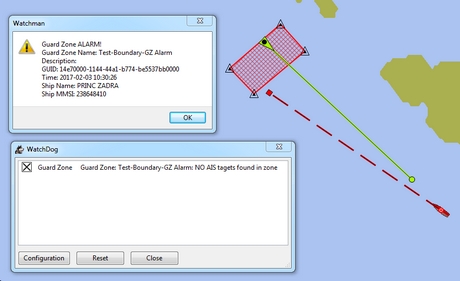
And the text in the Watchdog window turns red and says “AIS Target in zone”

As soon as the ship leaves the Guard Zone Boundary: Alarm is not triggered anymore.
The text in the Watchdog Window turns back to black and says “No AIS targets found in zone”.
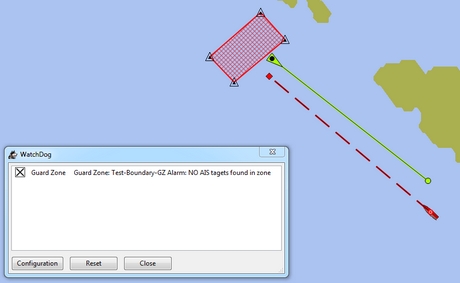
The Boundary AIS Guard Zone Alarm works!
Setting up an Inclusion Alarm
Setting up a Boundary Inclusion Alarm is similar to setting up a Boundary Guard Zone alarm. But instead of "Guard Zone" you click “Inclusion Alarm” and you put the GUID of the “Inclusion Alarm" Boundary in the field next to “Boundary GUID”.
Set up a new Watchdog-alarm and pick “Boundary”.
-
Select “Inclusion Alarm”
-
Edit the alarm so that the alarm will be coupled to the boundary you want to "stay inside" of.
-
In this example it is a boundary with GUID 6372ffff-7f0e-4a64-9e6c-dfd303620000
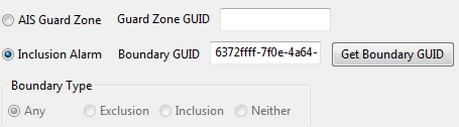
Don’t forget to set the Alarm Action and click OK.
Now lets see if it works….
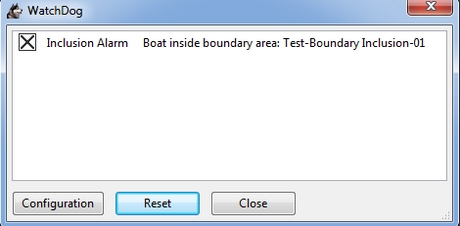
The own ship is inside the boundary. Watchdog watches over you and wants you to stay "included".
Well, in this case everything is just fine. Watchdog stays silent.
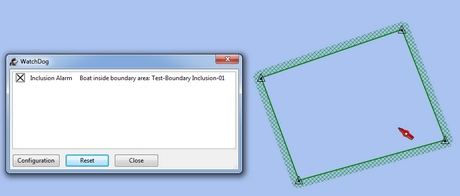
The text in the Watchdog window stays black.
But as soon as our ship leaves the boundary, Watchdog alerts us!
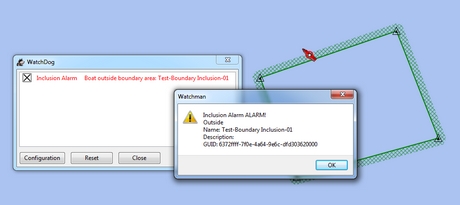
And the text in the Watchdog window turns red.
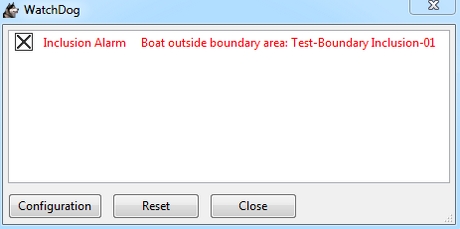
The "Boundary Inclusion" alarm works!
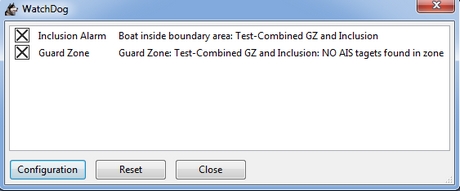
Combination of Boundary Guard Zone Alarm and Boundary Inclusion Alarm.
It is possible to assign a Boundary Guard Zone Alarm and a Boundary Inclusion Alarm to one and the same boundary.
That means that you can let Watchdog alert you:
-
when another ship enters your “safe” anchoring area
-
when you are drifting out of that area.
To achieve this, you use in the Boundary Guard Zone Alarm the same GUID as in the Boundary Inclusion Alarm. You can activate one of the two alarms, both of them or none of them. In this screenshot both alarms are activated.
6. DYNAMIC GUARD ZONES
The plugin "Ocpn_Draw" was invaluable to begin with, but got even better when it was updated with the possibility to draw a Guard Zone that moves with our own ship! Guard Zones differ from normal Boundaries, they move with your own ship and can rotate with the ships heading or with the ship’s course over the ground. Let’s call them "Dynamic Guard Zones".
As oDraw works hand in glove with WATCHDOG, these new features in oDraw also affect the way WATCHDOG can be used. Here are some examples. In these examples "Guard Zone" is shortened to "GZ".
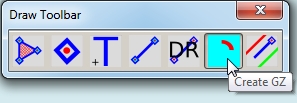
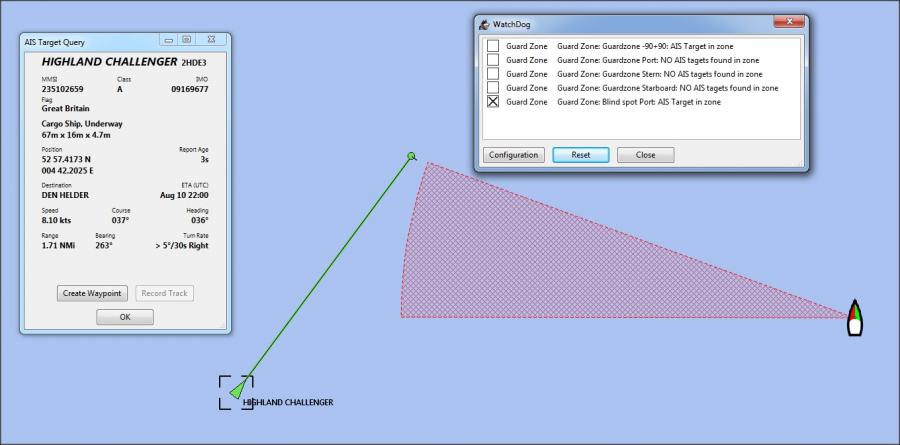
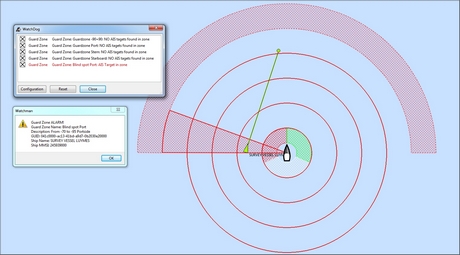
Let’s assume that our ship has a blind spot. A blind spot is an area around the ship that cannot be directly observed by the helms(wo)man. In this example the blind spot is on the port side and extends from 70 to 90 degrees. We want to be alerted if any ship (AIS-target that is) enters that blind spot. We can set up Watchdog to do that for us.
First set up a GZ Guard Zone. Open the Draw Toolbar
Click "Create GZ"
Set the first point of the GZ roughly abeam on the port side.
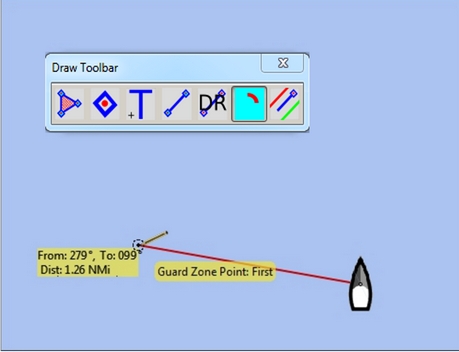
Set the second point a bit above and to the right of the first point (clockwise).
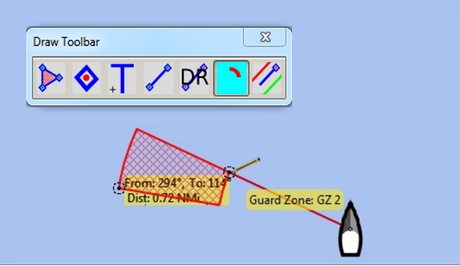
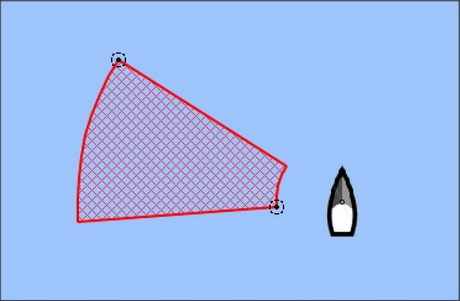
The result is some kind of wedge-shaped GZ.
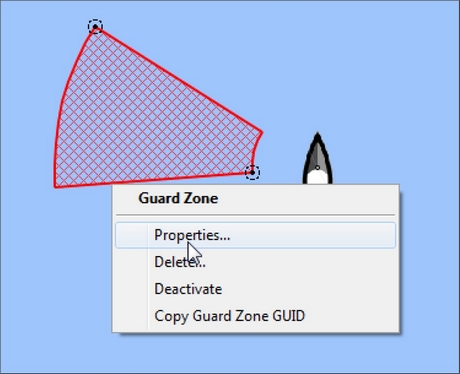
Now you should fine-tune that GZ. Click on the GZ and open the "Properties" tab.
Give your GZ a recognizable name and description. Choose the Colours and Line Width you prefer and fill in the required angles and distances. See the example.
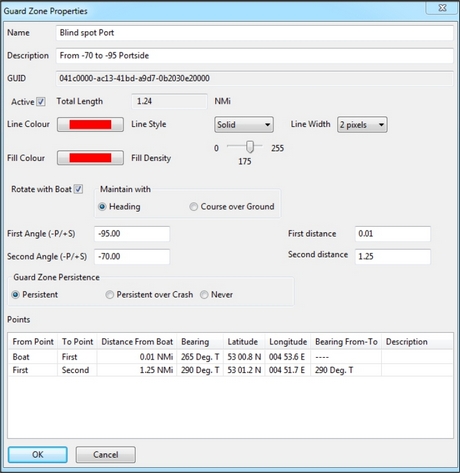
Note: the first distance is the distance closest to the boat. Make sure this distance is bigger than 0. In this example the first distance is set to 0.01 NMi or 18.52 meters. The second distance is the greatest distance from the boat. In this example that distance is set to 1.25 NMi.
As the blind spot extends from 70 to 90 degrees portside, we set the first angle to -95 (- is port, + is starboard) and the second angle to -70. The result is a wedge-shaped GZ that starts at 0.01 NMi, extends to 1.25 NMi and covers 15 degrees.
Make sure you put a checkmark at "Rotate with Boat"!!
The next step is to set up a Watchdog Guard Zone Alarm for that GZ. The steps to do that are described earlier in this manual.
Now we’ll put it to the test.
The Highland Challenger is closing in on our portside.
but as soon as she challenges our "slice of pie", Watchdog starts to alert us!
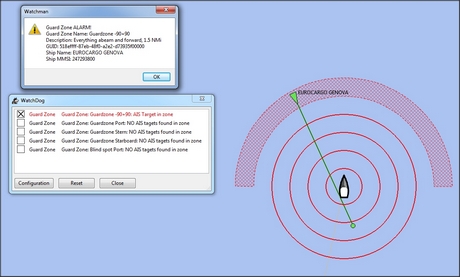
Some other examples:
A GZ that extends from 90 degrees Port to 90 degrees starboard.
The outer perimeter is 1.50 NMi, the inner perimeter is 1.25 NMi. The
four range rings around our own ship are set 0.25 NMi apart. Eurocargo
Genova is approaching on our port bow. Still more than 1.5 miles away,
but she’s a big one and doing almost 20 knots.
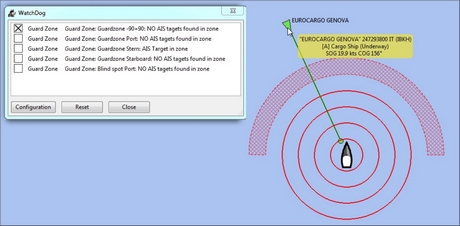
Luckily we’ve set up our GZ alarm.
A "Tri-colour" GZ.
Here we have three GZ’s around the ship. One (red) covering the 112.5 degree arc that coincides with the port navigation light, one (green) covering the 112.5 degree arc that coincides with the starboard navigation light and one (white) covering the 135 degree arc that coincides with the stern light. As all of these GZ’s are set up to rotate with the ship’s heading, they could be used to see at one glance whether another ship is in your red, green or white sector (also handy to remind some of us that "starboard is green and port is red"…..).
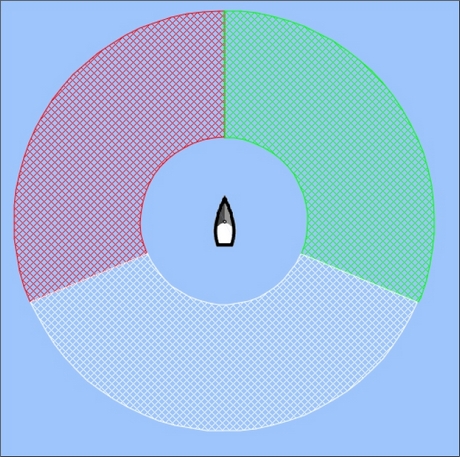
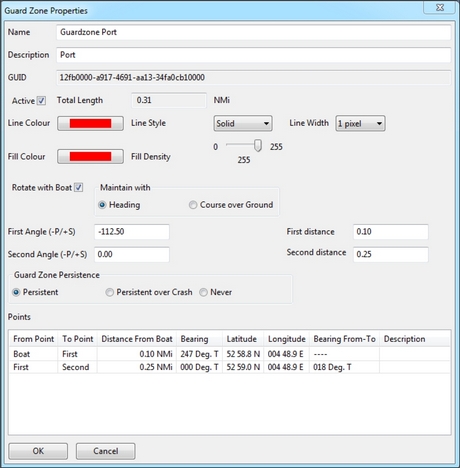
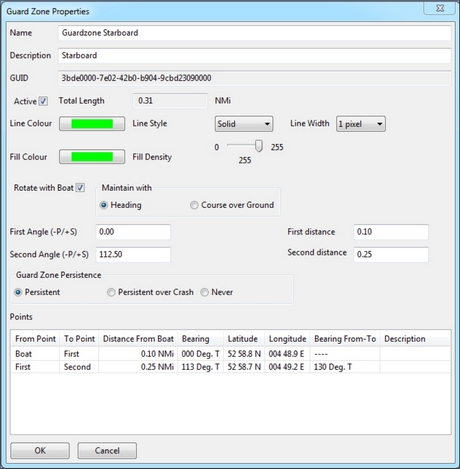
In this example the sectors range from 0.10 to 0.25 Nmi from our ship. This is how these three GZ’s (Guardzone Port, Guardzone Starboard and Guardzone Stern) are set up:
The red sector:
The green sector:
The white sector:
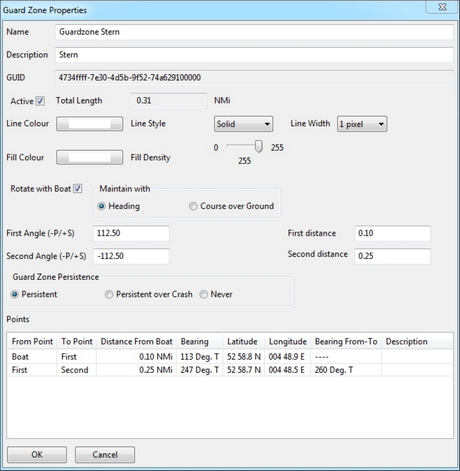
Note that the white sector is set by defining the first angle as 112.50 and the second angle as -112.50 this covers an arc of 135 degrees (360-225).
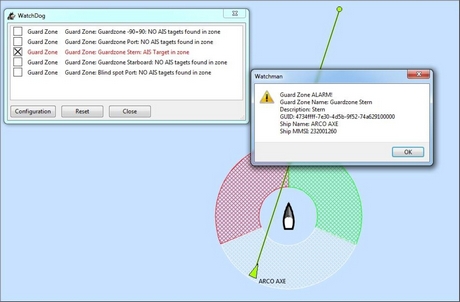
Arco Axe is sneaking up on us. GZ "Stern" is activated.
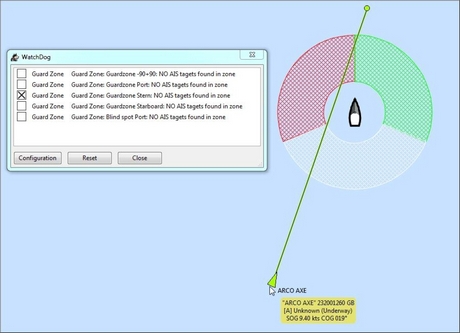
We really don’t want Arco Axe (or any other axe for that matter….) to hit us in the behind but before she can become a pain in the ass, Watchdog spots her and alerts us.
You can set up multiple Dynamic Guard Zones and set the alarms for one, some or all of these zones.
(Dynamic) Guard Zone Alarms are in some ways similar to the "AIS Collision Alarm" you can set in OpenCPN (Options-Ships-AIS Targets-CPA Calculation). But they are more versatile.
7. ANCHOR ALARM
The Anchor Alarm does not belong to the catgory "Boundary" as it is not related to a boundary. The Anchor Alarm is related to a specific position.
The pictures are self-explaining (or at least supposed to be).Set up a new watchdog alarm and pick "Anchor
In the "Edit Alarm" window, the latitude and longitude (Lat and Lon) of your ship wil be shown (or to be precise: the Lat and Lon of the "your ship" cursor, so make sure you have a GPS fix!).
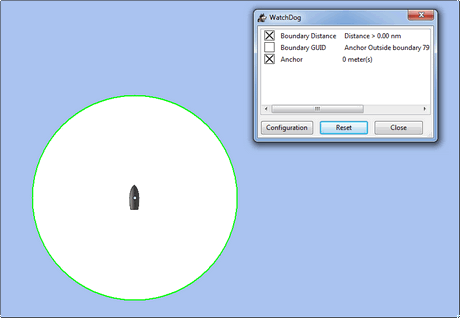
Radius can be set to whatever you like but "0 meters" will of course result in an unwanted amount of alarms. In this example radius is set to 50 meters. Click "OK". Then the alarm is enabled and the boat is within the radius of 50 meters from the specified position, the alarm is not triggered and the circle showing that radius has a green edge.
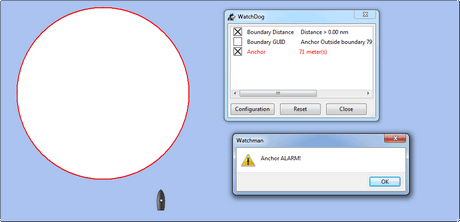
Moving the boat more than the pre-set radius (in this case 50 meters), triggers the alarm. The green edge turns red. The text in the WD window turns red and shows the distance from the specified position.
To Stop False Alarms (Hints):
-
Set the Anchor Alert at the same time and place as the Anchor! - As close as possible.
-
Set the radius a little larger.
-
Make sure you have set the anchor properly so it is not dragging and there is adequate scope.
-
Anchor out of kelp in good holding ground.
-
Change your anchor location, shallower or deeper, different bottom.
-
Check your GPS NMEA data stream to see if the GPS signal is reasonably constant.
To check your GPS Data Stream
In the NMEA debug window, do you see changes in the GPS receiver position reported by RMC or GLL messages? You can save this stream as a file using the VDR plugin and inspect it with a Text Editor.
Make sure there is no change in position reported by GPS receiver. Look at the RMC lines. The lat and lon fields are constant. EG: "3348.0358" and "15116.9019".
You will need to watch these values for a longer time to see change. Of course, if you cycle the power on the GPS receiver, you may see a change, particularly if the receiver selects a different set of satellites to calculate the position.
When this happens, by the way, it is a reminder of the essential limit of GPS positional accuracy.
You are getting 3 digits of precision, implying around 6 feet of accuracy.
But consumer-grade GPS is generally not repeatably accurate to 6 ft.
8. COURSE ALARM
Course Alarm is (of course) meant to alert you when you get off course. The problem with getting off course is that you might end up somewhere where you do not want to be.
Setting the Course-alarm is explained step-by-step by these screenshots.
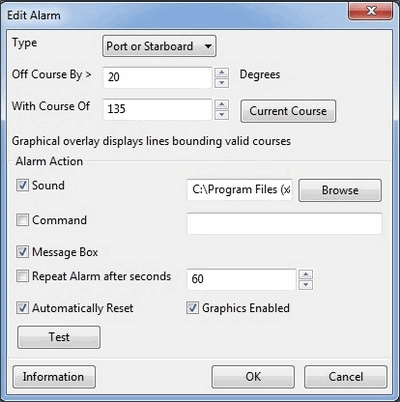
Set up a new watchdog alarm and pick "Course"
You can set the alarm for, for "Port" only, for "Starboard" only or for "Port or Starboard".
Choose "Port" if you only want to be alarmed when you go too far to port. Choose "Starboard" if you only want to be alarmed when you go too far to starboard. Choose "Port or Starboard" if you want to be alarmed when you go either too far to port or too far to starboard.

Choose how many degrees you want as margin before the alarm is triggered. You can specify the desired course either manually (enter the desired course yourself) or by clicking "Current Course". In that case Watchdog enters your present COG, as received from your GPS.
In this example Watchdog will start barking when you wander more than 20 degrees to port or more than 20 degrees to starboard from a course of 135 degrees.
After you are finished editing the alarm, click "OK".
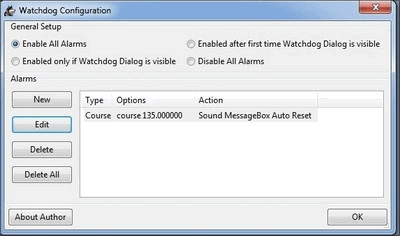
The "Course Alarm" shows up in the Watchdog Configuration window. Click "OK".
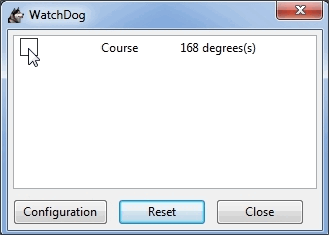
Watchdog shows your COG (in this example 168 degrees).
Tick the checkbox (if it isn’t ticked yet). Watchdog "Course Alarm" is now activated and wil alert you if your course is not between 115 and 155 degrees (135 plus or minus 20 degrees).
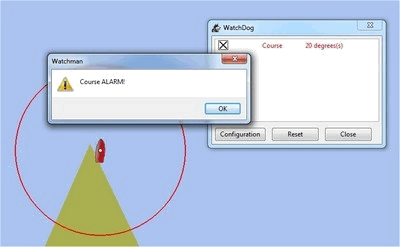
In the screenshot below the course is somewhere around 005 degrees. As that is (way) off course, the alarm is triggered.
9. SPEED ALARM
Speed-alarm is meant to alert you when your SOG gets below (Underspeed) or above (Overspeed) a specific speed. You can set a limit. That limit is the speed, in knots, you don’t want to get below or above.
Setting the Speed-alarm is explained step-by-step by these screenshots.
Set up a new watchdog alarm and pick "Speed"
In this example the alarm is set for "Underspeed" and set to 5 knots, because you want an alert when speed drops below 5 knots. However when riding bigger waves, speed can increase momentarily when surfing and and decrease on reaching the bottom. In such cases the Speed Alarm might get triggered with every wave. To prevent alarm cycling, set Watchdog to average your speed. You can set a slider from 1 second to 120 seconds.
In this example the slider is set to 60 seconds. Now Watchdog will only trigger the alarm when your average speed, measured over a period of 60 seconds, will be below 5 knots.

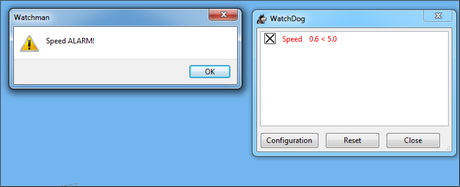
In this example the boat’s average speed over 60 seconds was 0.6 knots and the limit was set to 5.0 knots. Watchdog shows you "0.6 < 5.0" (0.6 is less than 5.0).
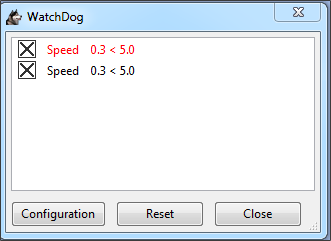
Here we have set two speed-alarms. One for Underspeed and one for Overspeed.

In this screenshot the limit was still 5.0 knots, but the boat’s average speed over 60 seconds was 0.3 knots. The "Underspeed" alarm was triggered and the text turned red. The "Overspeed" alarm did not get triggered and that text remained black.
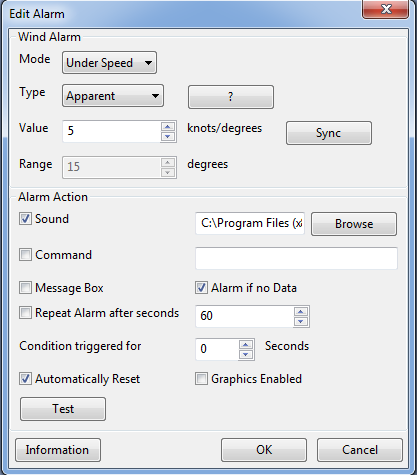
11. WIND ALARM
The wind-alarm has three modes: Under Speed, Over Speed and Direction. So the alarm can be set to warn you when the windvelocity exceeds a given value (Over Speed), drops under a given velocity (Under Speed) or changes direction.
Wind-alarm also has three types:
-
Apparent - measured from moving boat (requires only wind sensors)
-
True Relative - wind would feel like if boat stopped (requires windsensors + gps)
-
True Absolute - wind would feel if boat stopped and faced north (requires wind sensors + gps + compass)
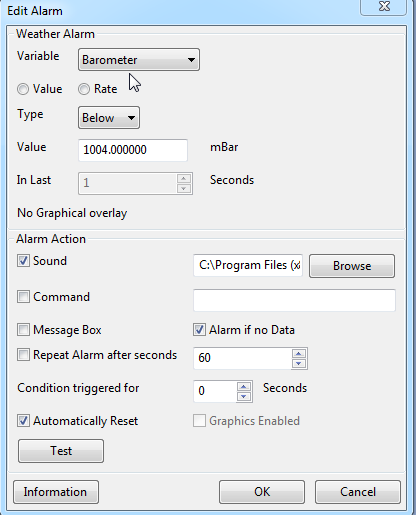
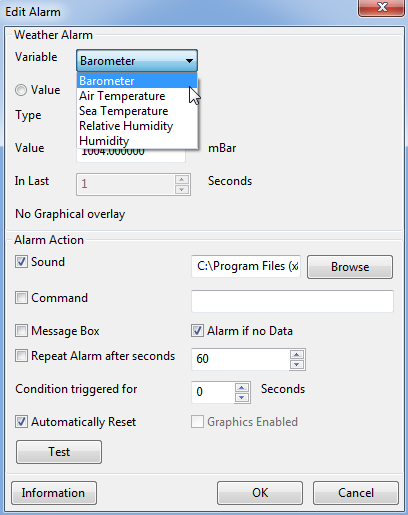
12. WEATHER ALARM
The Weather-alarm can be used to warn you for changes in airpressure, air temperature, sea temperature, relative humidity and humidity. This is of course only possible if there are (digital) sensors for these parameters connected to OpenCPN.
For the region of North Sea and Baltic Sea (40 - 60 degrees N) this table can be used as an indication:
air-pressure change in hPa per hour |
air-pressure change in hPa per 3 hours |
expected windspeed in Bf |
+1,3 to +2 |
+4 to +6 |
6-7 |
+2 to +3 |
+6 to +9 |
8-9 |
more than +3 |
+10 or more |
10 or more |
-1 to -2 |
-3 to -6 |
6-7 |
more than -2 |
more than -6 |
8-12 |
Note: In subtropic and tropic regions some of the above rules may not be valid at all! In tradewind- zones you should observe the daily variations: are they still present? If not: possible gale is to be expected.
Let’s say you want to be warned when the barometer drops more than 1,3 hPa per hour.
1 hectopascal (hPa) is equal to 1 millibar (mBar). So 1,3 hPa per hour = 1.3 mBar per hour or 1.3 mBar per 3600 seconds.
The setting in the WD-Weather-alarm would then be: Variable: Barometer Rate Type: Decreasing Value: 1.3 mBar In Last: 3600 Seconds
Weathertips:
Rapid pressure drop with no or almost no wind: sudden increase of windspeed / gale possible without any other sign! Weather front with rain coming before wind comes up: stronger winds are to be expected. Wind coming before rain: wind will probably not increase.
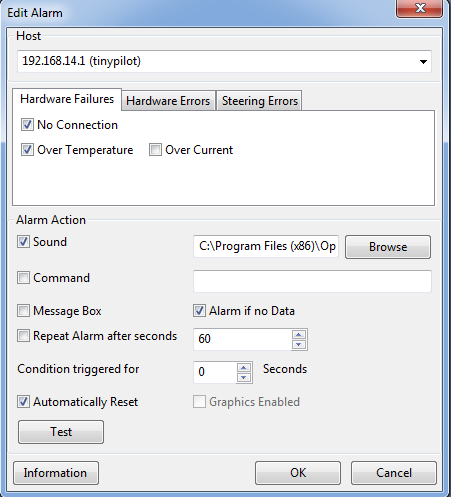
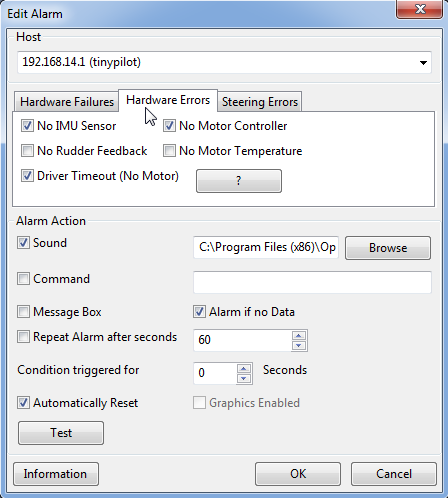
13. PYPILOT ALARM
Watchdog can be used in conjunction with the free software autopilot "Pypilot", wich is a separate plugin for OpenCPN.
For more information on Pypilot, see the (separate) Pypilot manual
In Watchdog there are several options to warn you for possible problems in the soft- or hardware of the Pypilot autopilot.
14. DEADMAN ALARM
Deadman Alarm alerts you (or your crew) when the watchman has fallen asleep, jumped overboard, after a set period of time the program has not had any user input. The objective is to assure someone is on watch. The Deadman alarm stops as soon as any action is taken, (movement of the mouse cursor). The only logical kind of alert for "Deadman" is some form of loud anannoying sound.
Setting the Deadman-alarm is explained step-by-step by these screenshots. Set up a new watchdog alarm and pick "Deadman"
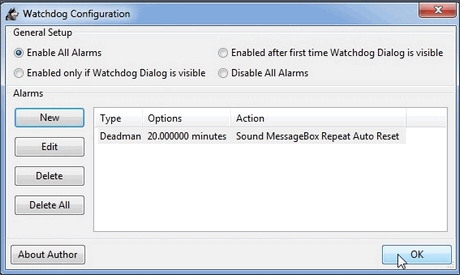
Once set, the clock starts ticking.
15. NMEA DATA ALARM
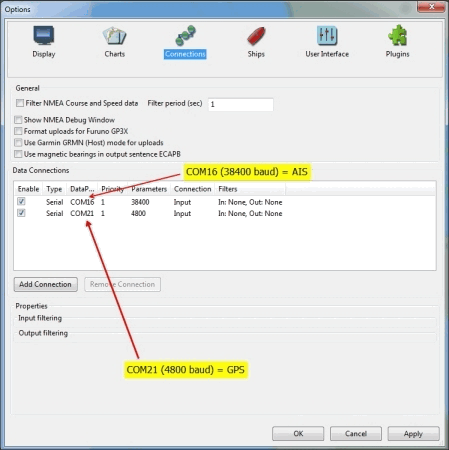
In Watchdog you can set NMEA-data-alarms. NMEA stands for National Marine Electronics Association. NMEA data consists of sentences, the first word of which, called a data type, defines the interpretation of the rest of the sentence. Each Data type would have its own unique interpretation and is defined in the NMEA standard. Examples of devices that communicate via NMEA-data with your computer are your GPS receiver and your AIS receiver. In this picture there is a set-up with a GPS receiver and a AIS receiver connected to OpenCPN. Here the GPS is on COM21 and the AIS on COM16.
NMEA and your position.
OpenCPN’s most important type of NMEA data is position, provided by your GPS receiver. Without receiving GPS data, OpenCPN loses own ship’s actual position. When GPS NMEA-data to OpenCPN stops, chartplotting and navigation stops. Own Ship might sail into a Boundary Area marked "exclusion", but the alarm won’t be triggered. Similar failures could occur with an Anchor Alarm. Dragging anchor will not trigger the alarm. It’s important to know when GPS fix is lost. GPS data is received as a data type beginning with "$" and the letters "GP". The most important NMEA data streams include the GGA sentence which provides the current Fix data, the RMC which provides the minimum GPS sentences information, and the GSA which provides the Satellite status data.
So, if OpenCPN receives $GPGGA, that means it receives a fix from your GPS.
Setting up a Watchdog-NMEA-alarm (GPS)
Set up a Watchdog-NMEA-alarm that warns when the GPS fix is lost for more than 10 seconds.
Set up a new watchdog alarm, choose "NMEA Data" and click "OK
Standard "$GPGGA" is set. Set timer to "at least every 10 seconds" and tick the other boxes as per the screenshot below. Click "OK"
Now the NMEA-alarm set, and will be triggered 10 seconds after OpenCPN stops receiving GGA-sentences.
NMEA and the position of other ships
NMEA-data shows own ship location and where other ships are located (AIS), what their name, callsign, SOG and COG are etc.
Good to have this data for a rendezvous or if you wish to avoid a collision.
These kind of data are received via an AIS receiver.
Multiple NMEA alarms
You can set a separate alarm for the loss of AIS data. It works the same as the GPS alarm but AIS data (from other ships) always begin with !AIVDM (don’t forget the exclamation-mark).
Setting up a Watchdog-NMEA-alarm (GPS)
You can add a new NMEA-alarm (see the previous steps) but now you fill in !AIVDM
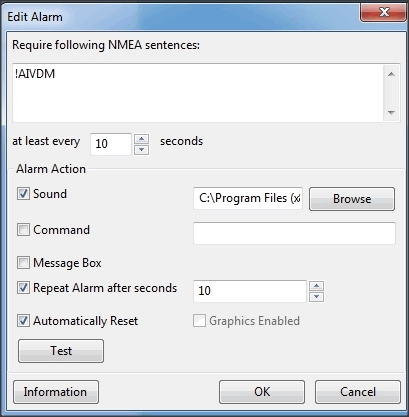
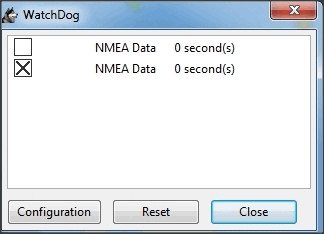
The result is two NMEA Data-alarms (one for GPS fix and one for AIS-data)
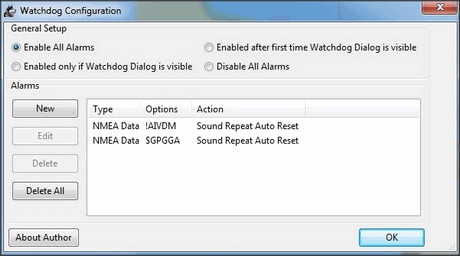
The upper NMEA Data alarm is the AIS-alarm. The lower NMEA Data alarm is the GPS alarm.
Each alarm can be switched on or off.
16. EMAIL ALERT
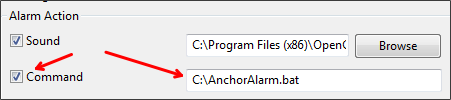
You can order Watchdog to execute a computer command. For example lets get Watchdog to send us an email in case our anchor drags. We have stored that command in a file we made and called AnchorAlarm.bat. In this example that file is stored in the root of our computer (C:\) but of course you can put in anywhere, as long as you tell Watchdog where to find it.
Sending emails from the command prompt can be done with a small tool called "Send-It-Quiet". More info: http://commandlinesendmail.blogspot.nl/
Example of the file AnchorAlarm.bat (in this example Send-It-Quiet is installed in E:\Tools\senditquiet\senditquiet)
Lets say:
-
You are Blackbeard
-
Your emailadress is blackbeard@gmail.com
-
Your Gmail username is blackbeard
-
Your Gmail password is 1loveGold2.
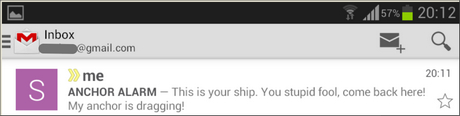
You want the program to send an email to yourself with the subject ANCHOR ALARM and the message This is your ship. You stupid fool, come back here! My anchor is dragging!
The batchfile would then be:
E:\Tools\senditquiet\senditquiet\senditquiet.exe -s smtp.gmail.com -port 587 -u blackbeard@gmail.com -protocol ssl -p 1loveGold2 -f blackbeard@gmail.com -t blackbeard@gmail.com -subject "ANCHOR ALARM" -body "This is your ship. You stupid fool, come back here! My anchor is dragging!"
The result when the anchor alarm gets triggered…
Note Of course this only works when you can actually email from the computer OpenCPN is installed on! This example is tested on a Windows 7 PC with Internet connection and a Gmail-account.
If, after reading all of the above, you still wonder why Watchdog could be of any use for navigation, we strongly advise you to sell your boat.