SAR_pi Manual - OpenCPN
This document is about the 'sar_pi' plugin, which we will refer to as SAR_pi in this manual.
This document is not meant to replace official SAR manuals.
The sole purpose of this document is to explain SAR_pi so that you can use that plugin in OpenCPN.
Goal
SAR_pi generates search patterns for SAR missions and saves them as GPX files for importing into OpenCPN.
How to install
-
From the plugin catalogue in OpenCPN (more information below)
-
By manually compiling the source code from Github and importing the plugin in OpenCPN (more information in the README.md)
Links
-
Source: Github Repository
-
Forum: SAR Plugin Thread
Contributions
The plugin was developed by SaltyPaws, based on the external software SAR Search patterns by Andres Ruiz González.
Rasbats has updated the plugin, following advice from an Australian SAR Operations Centre Coordinator, Stephen Hancock.
RGleason has contributed ideas for the GUI.
Kupofty has contributed to GUI updates, bug fixes and code refactoring.
References
Please consult the latest editions of these:
1. IAMSAR Manual (International Aeronautical and Maritime Search and Rescue Manual) https://maritimesafetyinnovationlab.org/wp-content/uploads/2021/02/Doc.9731-EN-IAMSAR-Manual-International-Aeronautical-and-Maritime-Search-and-Rescue-Manual-Volume-III-Mobile-Facilities.pdf
2. UNITED STATES NATIONAL SEARCH AND RESCUE SUPPLEMENT (NSS) to the International Aeronautical and Maritime Search and Rescue Manual
3. U.S. COAST GUARD ADDENDUM TO THE UNITED STATES NATIONAL SEARCH AND RESCUE SUPPLEMENT (NSS)
4. Marine Knowledge https://web.archive.org/web/20210916104627/http://www.marine-knowledge.com/marine-navigation/search-and-rescue-patterns/
This last is the only reference that we have found for the 'Quadrant Search (Oil Rig)' search (may take some time to load the page as it is a Wayback Machine archive).
What does SAR_pi do?
SAR_pi is a plugin that can generate different types of Search and Rescue search patterns directly from within OpenCPN. You can save these patterns as GPX files.
These GPX files can then be loaded in OpenCPN and used as routes to follow in order to perform an efficient search and rescue operation.
Note: In this document “Search And Rescue will be shortened to “SAR”.
When to use it ?
When a SAR operation is necessary, there is absolutely no time to lose.
It can be a fellow sailor who is in distress, or a loved-one who fell overboard during a dark and rough night.
It is very important that your search operation is as efficient as possible. Meaning that with the required speed you cover a maximum of the search-area in a minimum of time. In order to achieve that, it is best to follow certain patterns. These search-patterns have proven to give the best results for certain conditions.
When the need arises, you can start thinking about making a search pattern. And then you have to actually lay out that pattern as a track or route to follow. But that will take you some time and it requires clear thinking. And especially in those situations “clear thinking” is challenged by a lot of other worries on your mind.
Let SAR_pi do the work for you!
Note: in most circumstances SAR operations are coordinated by the Coast Guard or other professional search and rescue-organisations. These operations are coordinated and executed by highly trained specialists and follow specific rules and procedures.
This manual is meant primarily for situations where you are on your own and you are the first (or only) ship in the vicinity.
Choosing the right search-pattern.
Expanding Square Search:
-
when the location of the search object is known within relatively close limits;
-
when searching for persons in the water or other search objects with little or no leeway.
(but keep in mind: this procedure is less suited to be used simultaneously by multiple vessels)
Terminology
Nobody is eager to get involved in a situation that necessitates a SAR-operation. Not as the object that has to be found and not as a vessel that participates in the SAR-operation. But if you do, you will have to understand that one of the keys to a successful operation is coordination and the avoidance of miscommunication. That involves understanding some specific terms and abbreviations.
-
SAR: Search And Rescue
-
SRU: Search and Rescue Unit (for instance: your ship).
-
Search speed: This is the speed of the searching ship. Note: the higher the speed, the greater the distance you can cover in a given time. But high speed might also result in a bigger risk of passing the position of the searched object without noticing that object.
-
Search Area: the area most likely to contain the search object.
-
Datum: the Datum is the most probable location of a search object, corrected for movement over time (drift). So that’s the place we would normally begin our search.
-
Search Leg: a Search Leg is the long leg of a parallel search pattern.
-
Cross Leg: a Cross Leg is a connection between two search legs of a parallel search pattern.
-
Sweep Width: the distance an SRU should be able to detect the search object on either side of the leg. Sweep Width will be affected by the height of the observer and the weather-conditions. A clear day and calm sea will give a larger Sweep Width than a stormy night. type or size of the target, A distressed vessel will be easier to see than a head in the water.
-
Leg Spacing: the distance between two parallel Search Legs. That distance should be no more than 2x Sweep Width.
-
RCC: Rescue coordination centre: A unit responsible for promoting efficient organization of search and rescue services and for coordinating the conduct of search and rescue operations within a search and rescue region.The RCC normally assigns a SMC.
-
SMC: SAR Mission Coordinator: The official temporarily assigned to coordinate response to an actual or apparent distress situation. The SMC can assign an OSC.
-
OSC: On-scene coordinator: A person designated to coordinate search and rescue operations within a specified area.
-
CSP: Commence Search Point: Point, normally specified by the SMC, where a SRU is to begin its search pattern.
On-scene coordination
When two or more SRU’s are working together on the same mission, one person on scene may be needed to coordinate the activities of all participating SRU’s.
The person in charge of the first SRU to arrive at the scene will normally assume the OSC function until the SMC arranges for that person to be relieved.
The OSC is normally a person in charge of a:
-
ship or aircraft participating in a search, or
-
nearby facility in a position to handle OSC duties.
Initiation of search
-
When a SRU arrives on-scene in advance of the others, it should proceed directly to datum and commence an expanding square search.
-
If possible, datum may be marked by putting over a liferaft or other floating marker with a leeway similar to that of the search object, as a check on the drift.
-
This can then be used as a datum marker throughout the search.
-
As other SRU’s arrive, the OSC should select one of the search patterns, as appropriate, and allocate search sub-areas to individual SRU’s.
-
In good visibility and with sufficient SRU’s, the OSC may let the first SRU continue its expanding square search while the others conduct a parallel track search through the same area.
In restricted visibility, or if sufficient SRU’s are not available, it will probably be better to have the first SRU break off the expanding square search and be available for initiation of a parallel track search.
On-board preparation
Search patterns are for the “S”-part of SAR. But let’s not forget the “R”-part (after all, that “R”-part is the one and only reason for the “S”-part). So prepare yourself to do what has to be done once the search proves succesful. That will probably be:
-
assisting distressed craft and/or
-
recovering people from survival-craft or from the water.
Be aware of drift!
Precise search pattern navigation using high-precision methods such as GPS-systems will produce good patterns relative to the ocean bottom, but not relative to the drifting search object. This could allow the search object to drift out of the search area. Therefore the currents and other forces affecting the search object’s drift during the search should be taken into careful consideration. If a smoke float or other highly visible, expendable object is available, it should be deployed at datum and the pattern should be performed relative to it.
Be aware of the risks involved!
Vessels proceeding to assist should assess the risks they may encounter on scene, including the risks such as those associated with leaking cargo, etc. Information should be sought as necessary from the distressed craft and/or from the RCC or, if no RCC is involved, the OSC.
Now you’re ready to read on….
Installation
Note: In this section the instructions are specifically for SAR_pi, but there is a dedicated page in the User Manual with information about Downloading, Installing and Enabling Plugins in general.
The plugin is "managed" and is installed with the plugin manager.
Before you can actually use the plugin, you first have to enable that plug-in in OpenCPN.

Search Patterns
The ability to quickly deploy efficient search and rescue patterns is relevant since no matter how developed our means of transportation may get, the possibility of an emergency arising due to an accident or other reasons can never be ruled out. Specific SAR patterns have been worked out to deal with maritime emergencies. These various search and rescue patterns will be explained below.
Types of Search and Rescue Patterns
SAR_pi can generate 4 different types of search patterns. They are:
-
Parallel Track Search
-
Expanding Square Search
-
Sector Search
-
Quadrant Search (Oil Rig)
In the section “Operation” we will explain the patterns in some more detail.
Standard Actions
Click the SAR icon in the Toolbar
Choose the desired search pattern. In this example: Parallel Track
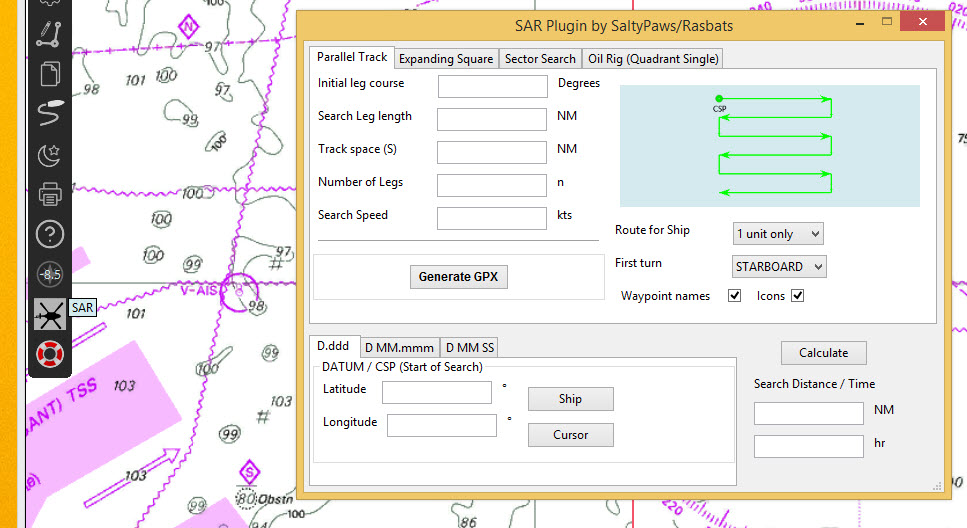
The plugin has a window with two sections: the top half and the bottom half.
Top half of the window
Here you can set the type of search-pattern. The initial pattern is the type “Parallel Track”.
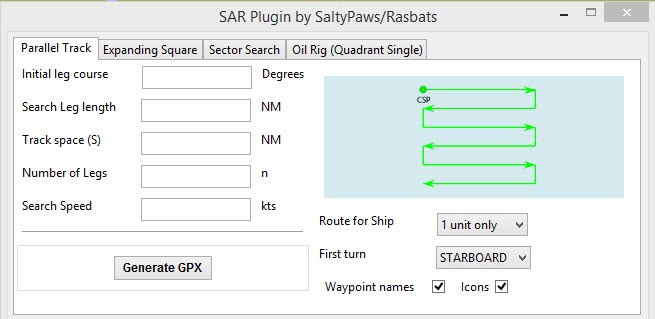
In each search pattern you can enter several parameters, for instance the search speed. They will be explained in more detail in the specific section for each type of pattern There are also buttons to calculate the distance and time of the search pattern and to generate a GPX file for that pattern.
But before you generate the GPX file, go to the bottom half of the window.
Bottom half of the window
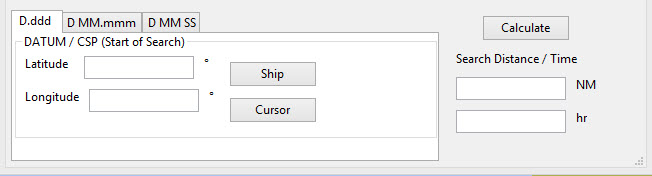
The bottom half of the window is for entering the start-position of the search pattern and for showing the results (the distance of the calculated search pattern and the time it will take to complete that pattern).
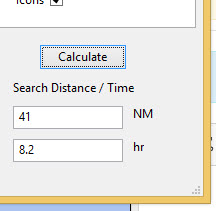
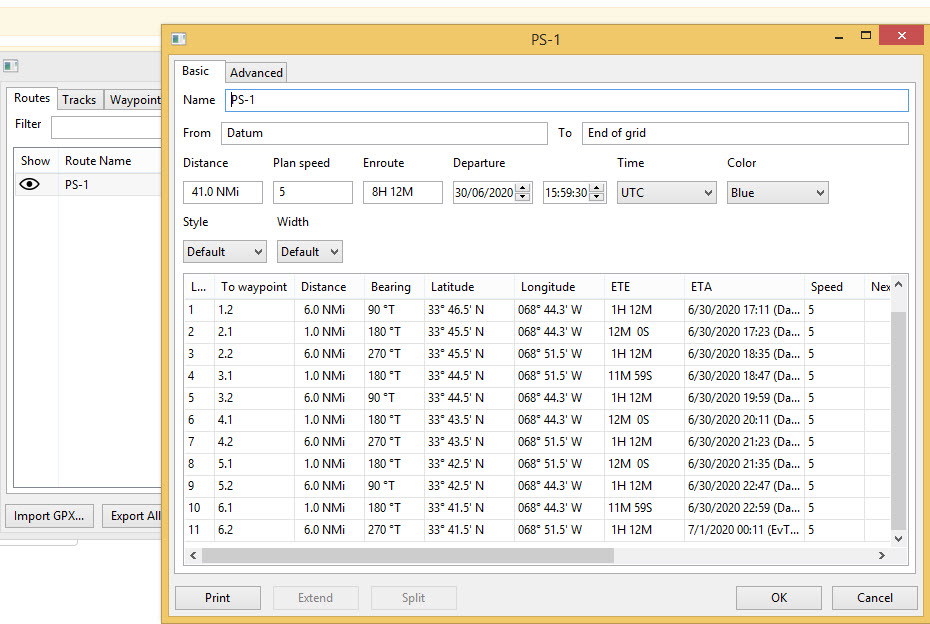
When the parameters for the search-pattern are entered, you can click “Calculate”. In the case of the Parallel Track search the Commence Search Point (CSP) is not the datum. The CSP must be chosen to optimise the outcome of the search, based on likely drift and time since the casualty was reported. A warning message advises that the CSP is being used.

and find out that (in this example) the pattern will cover 41 NM and will take 8.2 hours to complete.
If you want the search pattern to start at your ship’s position you go to the bottom half of the window and click “Copy ship position”.
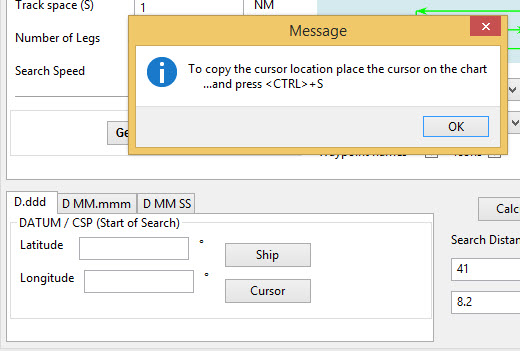
You can also use the position of your cursor on the screen. For instance when you are still some distance away from the area where the search has to take place. A message will pop up to tell you to move the cursor to the position on the chart and press Ctrl-S.
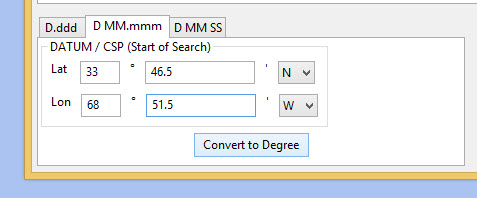
A third option is to enter latitude and longitude of the starting position by hand.
For example: you hear a MAYDAY of a ship that is sinking in position 33 degrees 46.5 minutes North / 068 degrees 51.5 minutes West.
Fill in the position and click “Convert to degree”.
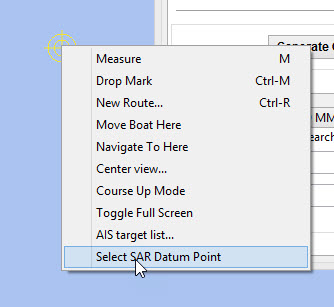
The final option is to use 'Right-Click' on the position for the Datum Point/CSP. Use the option 'Select SAR Datum Point' to transfer that position to the dialog.
Now click “Generate GPX”.
We save the file in a folder where it can easily be found. For instance in a folder “SAR”.
Abbreviations are used professionally for the different search patterns. The plugin tries to reflect these, not only in the default GPX file names but also in the routes that appear when imported into OpenCPN:
-
PS : Parallel Search
-
SS : Expanding Square Search (Square Search)
-
VS : Sector Search (Vector Search)
-
QS : Quadrant Search (Oil Rig)

How to use the SAR search pattern in OpenCPN
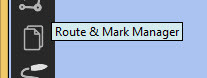
Go in the OpenCPN Toolbar to “Route & Mark Manager” and import the GPX-file as a route.
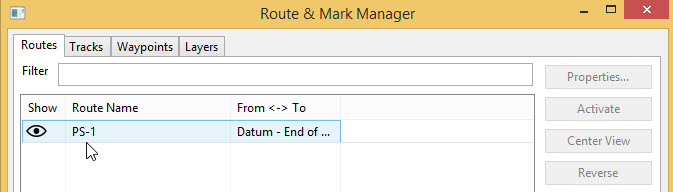
The search pattern will show up as a new route. Make sure it is “visible” (the “eye” should be open). You can inspect the properties of the route. The speed you choose for the search will be used for the route calculations and will appear in the route manager.
The standard actions can be summed up as:
-
Choose the desired search pattern “Parallel Track”, “Expanding Square”, “Sector Search” or “Quadrant Search (Oil Rig)”.
-
Enter the parameters.
-
Click “Calculate” to find out how long the search track will be in nautical miles and how long it will take you to complete that search.
-
Click “Generate GPX” to generate a GPX file of the search pattern.
-
Open “Route and Mark Manager”
-
In the “Route” tab, Click “Import GPX”
-
Find the GPX-file you just generated and click “OK”.
-
The search pattern will appear on your screen and can be used as a route.
"Parallel Track" Search
Keywords:
-
LARGE AREA
-
POSITION OF SEARCH OBJECT APPROXIMATE
-
UNIFORM COVERAGE DESIRED
-
SEARCH LEGS PARALLEL
Parallel Track Search:
-
is used to search a large area when survivor location is uncertain.
-
is usually used when a large search area must be divided into sub-areas for assignment to individual SRU’s on-scene at the same time.
-
has search legs with their longest side oriented true north or, when drift has to be considered, oriented in the direction of the drift line.
-
can be undertaken with one or more vessels (preferably with at least two ships).
Risk with restricted visibility
A parallel track search in restricted visibility poses problems because of the following considerations:
-
desirability of reducing the interval between SRU’s as much as possible consistent with safety resulting loss of search area coverage;
-
potential risk of collision
Setting up a "Parallel Track" pattern.
Click the SAR icon in the Toolbar Choose the desired search pattern. In this case: Parallel Track.
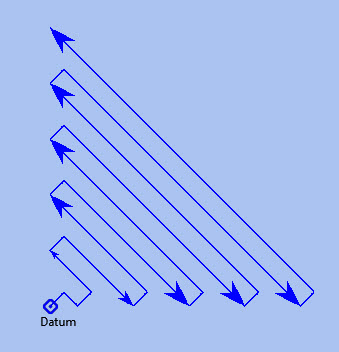
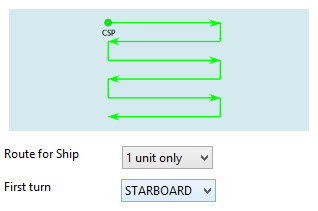
We have already seen the first parallel track search pattern in Standard actions. This was made using the default 'Starboard' button. It is for one unit and the first turn of the pattern is to starboard.
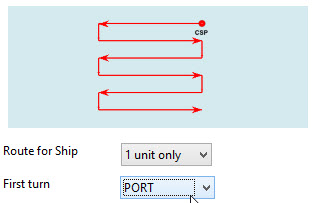
We can choose to make the first turn to port.
If two units are available we can generate the patterns for the two units as separate routes in a single GPX file.
For the first turn “Starboard” selection the following parameters were used:
-
Initial leg course = 030 degrees
-
Search Leg length = 3 NM
-
Track Space = 0.5 NM
-
Number of Legs = 4
-
Search Speed = 5 knots
“Initial leg course”
The Initial leg course is the direction you want the “legs” to point. Normally this will be at 90 degrees to the direction of the drift or, if no drift has to be taken into account, true north. In the following example we have entered 030 degrees (roughly Nort-East).
“Search Leg length”
This is the length in nautical miles of each leg.
“Track space”
This is the distance in nautical miles between two (parallel) legs.
Note: when the lookout is positioned high above the water, for instance in a crow’s nest, the lookout has a better view and can see object further away than when he would be positioned low above the water. In such cases the distance between the legs can be greater than when the lookout is low above the water. See also the explanation of “Sweep Width”.
“Number of legs”
This the number of legs you want to use in the search pattern. The higher the number, the more legs and the longer the search pattern.
“Search speed”
This is the speed of the searching ship. Note: the higher the speed, the greater the distance you can cover in a given time. But high speed might also result in a bigger risk of passing the position of the searched object without noticing that object.
We use the position of our cursor as the starting point (as described under “Standard Actions”),
Back in the top half of the window we click “Generate GPX” and save the GPX-file (as described under “Standard Actions”)
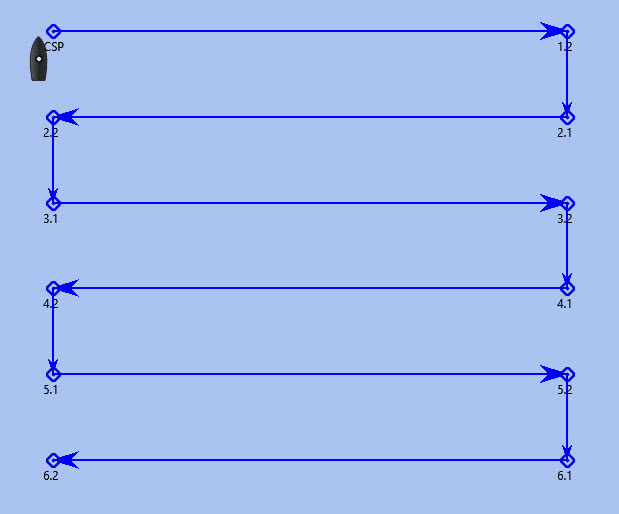
In OpenCPN we open the GPX-file as a route (as described under “Standard Actions”) and this is the result.
The pattern has 4 legs, 0.5 nm apart from each other and the first leg is orientated in the direction 030.
Activate the route and start your SAR operation!
Note: in these screenshots the “own ship” icon is pointing upwards (away from the starting-point). There is no GPS feed.
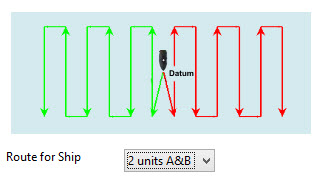
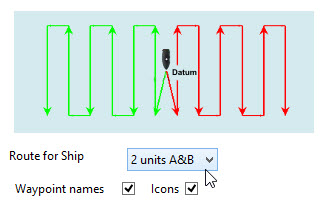
Parallel Search with 2 ships.
If there are two ships participating in the search, you use the option “2 units A&B”. We assume the “mothership” launches her (faster) RIB.
Repeat the process of creating the GPX file, saving it and opening it as a route in OpenCPN.
This is the result with both of the routes shown.

The search-pattern for ship B is the route coloured red.
Let us assume that ship B is a RIB that can easily cruise at 15 knots. When we look at the two routes PS-AB-1 and PS-AB-2 they initially have the same speed. Using the route manager it is possible to change the planned speed for ship 2 (B) from 5kts to 15kts in order to estimate the time the rib will take on that part of the search.
Note: Suppose there are two ships. One is the relatively big and slow but comfortable mother-ship with her well-equipped navigational area (and of course OpenCPN plus SAR-plugin). The other ship is the small and fast but very uncomfortable RIB that’s speeding towards the search-area. Now it is possible to generate the SAR-patterns in the relative comfort of the mother-ship (or even from a shore-based station) and then send the generated GPX-file(s) via email to one or more other ships. Like that RIB. There that GPX-file can be received (and used!) on a mobile phone that has OpenCPN for Android!
How to use the SAR search pattern in OpenCPN
Go in the OpenCPN Toolbar to “Route & Mark Manager” and import the GPX-file as a route.
The search pattern will show up as a new route. Make sure it is “visible” (the “eye” should be open). You can inspect the properties of the route. The speed you choose for the search will be used for the route calculations.
The standard actions can be summed up as:
-
Choose the desired search pattern “Parallel Track”, “Expanding Square”, “Sector Search” or “Quadrant Search (Oil Rig)”.
-
Enter the parameters.
-
Click “Calculate” to find out how long the search track will be in nautical miles and how long it will take you to complete that search.
-
Click “Generate GPX” to generate a GPX file of the search pattern.
-
Open “Route and Mark Manager”
-
In the “Route” tab, Click “Import GPX”
-
Find the GPX-file you just generated and click “OK”.
-
The search pattern will appear on your screen and can be used as a route.
"Expanding Square Search"
Keywords:
-
SMALL AREA
-
FIRST SEARCH LEG IS EITHER DIRECTION OF DRIFT OR TRUE NORTH
-
ALL TURNS ARE 90º TO THE RIGHT
-
TRACK SPACING DETERMINES 1ST AND 2ND LEG THEN ADD ONE TRACK SPACING EVERY OTHER LEG
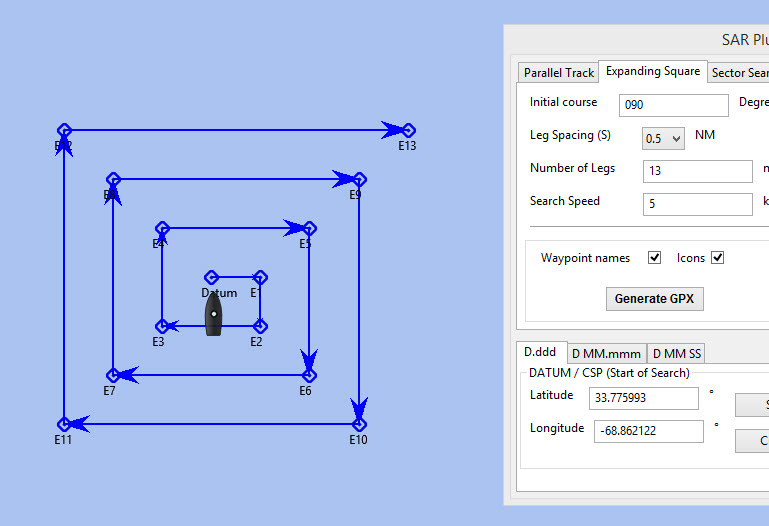
Starting at the probable location of the target, the search vessels expand outward in concentric squares.
This pattern is the most effective pattern when the location of the search object is known within relatively close limits.
The commence search point is always the datum position. The first leg should be in the direction of wind and tide.
Expanding square search is often appropriate for vessels or small boats to use when searching for persons in the water or other search objects with little or no leeway.
Due to the small area involved, this procedure is less suited to be used simultaneously by multiplevessels.
Setting up an "Expanding Square" search pattern
Click the SAR-icon in the Toolbar Choose the desired search pattern. In this case: Expanding Square.
The parameter-window shows these fields:
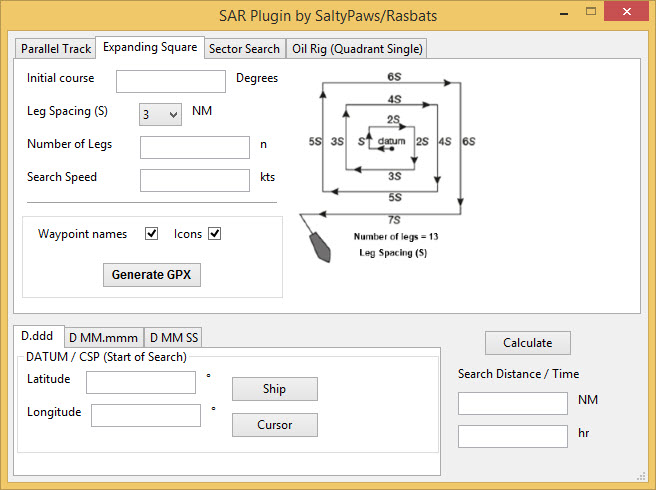
The initial course should be set in the direction of the drift, or else to 000 (true North). The rest should be easy to understand, so we will not explain this further.
Following the steps described in “Standard Actions” and using the parameters in the screenshot will give a result that looks like this:
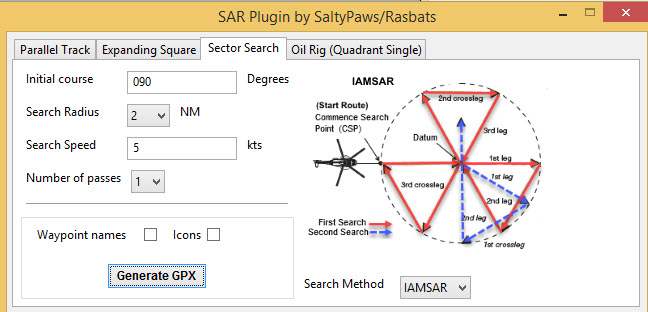
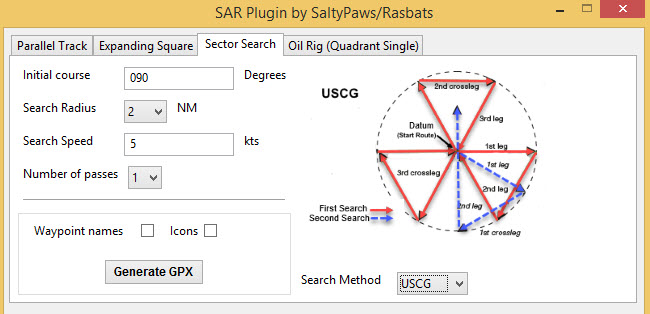
"Sector Search"
Keywords:
-
RELIABLE POSITION OF SEARCH OBJECT
-
SMALL SEARCH AREA
-
DATUM AT CENTER
-
STARTS AND ENDS AT DATUM
-
ALL TURNS ARE 120º TO THE RIGHT
-
1ST LEG IN DIRECTION OF DRIFT
The sector search is employed when the position of the lost ship or lost body is known accurately and the search has to be carried over a small area, say with each leg a length of no more than 2 to 5 NM. It is normally carried out in the area where the casualty or the object has been sighted.
IAMSAR
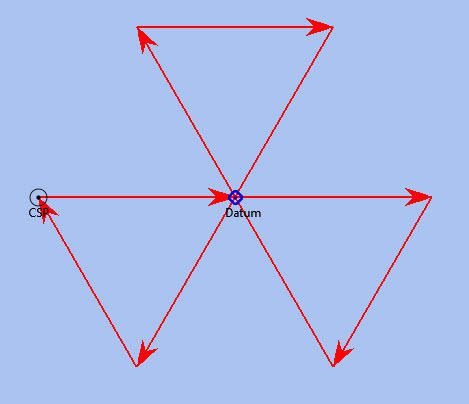
The search pattern starts from the Commence Search Point (CSP). The initial course then passes through the datum and should be in the direction of the wind/tide or overall drift.
USCG
The search pattern starts from the datum point and continues on the initial course.
This pattern gives a very high probability of detection close to the datum point and spreads the search over the probable area quickly. With a man overboard, the ship returns immediately to the datum or, if the search target is once sighted and then lost, the ship heads for the datum.
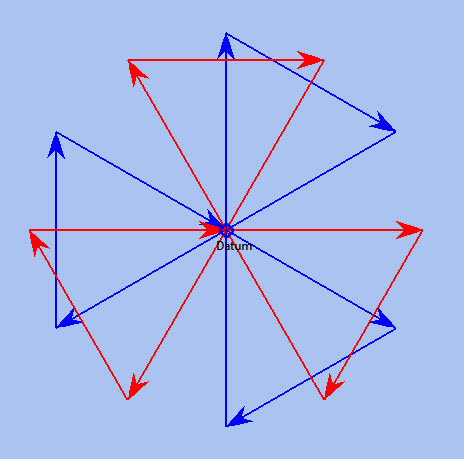
All turns are 120 degrees to starboard. Upon completion of the search pattern, re-orient the pattern 30 degrees to the right and search a new pattern (see the dashed lines).
The advantage of this pattern is that the search vessels cross the datum a number of times. The first step is to determine the drift and carry out the operations in that direction (first leg in the direction of the drift).
A suitable marker (for example, a smoke float or a radio beacon) may be dropped at the datum position and used as a reference or navigational aid marking the centre of the pattern.
An aircraft and a vessel may be used together to perform independent sector searches of the same area.
NOTE: Due to the small area involved and the fact that the search vessels cross the datum a number of times, this procedure is less suited to be used simultaneously by (a lot of) multiple vessels.
Setting up a "Sector Search" pattern.
Click the SAR icon in the Toolbar
Choose the desired search pattern. In this case: Sector Search
The parameter window shows these fields:
IAMSAR
USCG
The initial course should be set in the direction of the wind/tide or overall drift, or else to 000 (true North).
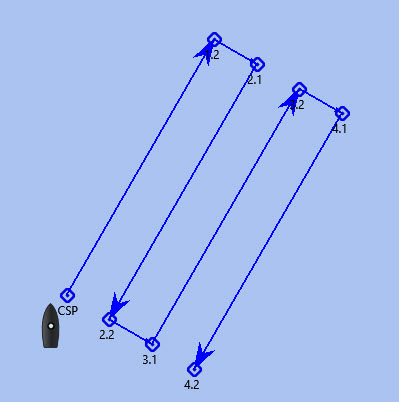
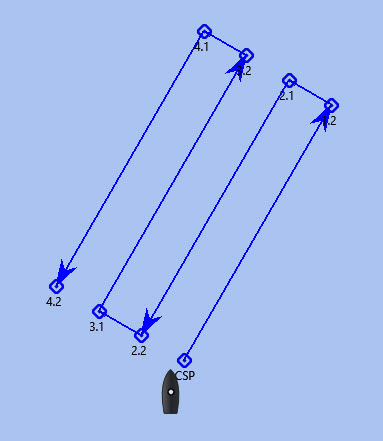
Example:
Note: For these examples it was decided not to use waypoint names or icons to help the clarity of the diagrams.
Following the steps described in “Standard Actions” will give a result that looks like this:
IAMSAR
Search starts at the CSP.
USCG
Search starts at the datum.
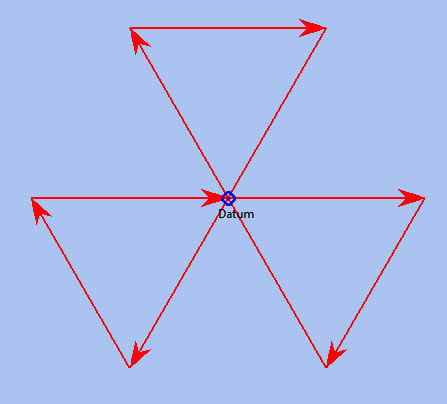
Note: the search-patterns are loaded as “routes”. And as with any route, you can adapt the appearance of that route (colour, style and width).
If you use the option for 2 passes the result will look like this:
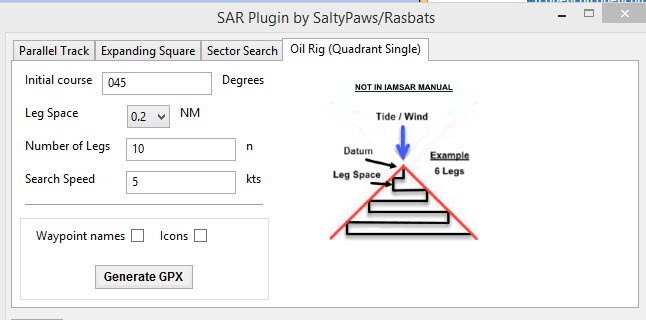
"Quadrant Search (Oil Rig)"
Note: This search pattern is not shown in the IAMSAR manual or USCG publications.
Keywords:
-
FROM STATIONARY OBJECT
-
QUADRANT
In the so-called “Oil Rig pattern”, the search sectors are placed into a quadrant.
This pattern is meant to be used when someone has fallen from a stationary object (like an oil rig is, or at least is supposed to be) and the search area is confined to one quadrant.
Setting up the "Quadrant Search (Oil Rig)" pattern.
Click the SAR icon in the Toolbar
Choose the desired search pattern. In this case: Quadrant Search (Oil Rig)
The parameter window shows these fields:
Example:
Following the steps described in “Standard Actions” (and with these parameters) will give a result that looks like this: