StatusBar
Alternative to the Standard Status bar at the bottom.
Author: Sean D’Epagnier
Maintenance: Rick Gleason, Jon Gough and the Plugin Team
PI Manager Workflow: Testplugin
Links
-
Maintained Source: https://github.com/rgleason/statusbar_pi
-
Download: https://opencpn.org/OpenCPN/plugins/statusbar.html
-
Forum: CF Statusbar_pi Thread
-
YouTube: Statusbar
1. What and Why
What can StatusBar do?
Shows Dashboard and Nmea Data at the bottom of the screen in various formats.
Why is StatusBar useful?
Informs the skipper of conditions that are useful in navigation. StatusBar plugin replaces builtin statusbar. The builtin status bar (disable from the User Interface tab) can be very difficult to read.
The statusbar plugin improves on some of these difficulties. It is best used with OpenGL enabled (requires some basic OpenGL extensions).
2. Installation
Statusbar is available as a managed plugin. The OpenCPN Manual has general information in Plugin Download, Install and Enable for installing this plugin. This is the preferred way.
In OpenCPN, go to the Options → Plugins and download, install and enable the sQuiddio plugin (no settings are required).
-
In OpenCPN Click Tools-Options-Plugins
-
First "Update" the master plugins catalog.
-
Select the Statusbar entry and "Install" the plugin.
-
In the list of installed plugins "Enable" the sQuiddio plugin and "Apply".
-
Use “Preferences” to set your preferences (should be self-explanatory). Then “Apply.
-
After successful installation, the plugin should be available in the plugins tab of your OpenCPN options dialog box.
-
Then close Options and the data should appear at the bottom of the screen.
4. Preferences Menu
Display String
Display of data is controlled in the Preferences menu in the Display String area. Below is the default Display String entered under Preferences. This area is edited to display the information you would like shown on the screen.
%02A %2.2B%D %02E %2.2F%H %.1I %03J\n%02O %2.2P%R %02S %2.2T%V %03W %.2X %03.aThe formatting and values available to the user are listed below under Info
Fonts, Color and Transparency
Under preferences the user can select font, font color and size as well as transparency.
Select Dropdown
Used to control the Appearance of the data. There are three Select string types which can be picked from the dropdown: Default, Ownship, Multiline
Default
wxString DefaultString = _T("Info Button User Defined Values");
Example:
"Ship %02A %2.4B %D %02E %2.4F %H SOG %.2I COG %03J %02O %2.4P %R %02S %2.4T %V %03W %.1X Scale %Z"
Ownship
wxString OwnshipString = _T("Info Button User Defined Values");
Example:
"Ship %02A %2.4B %D %02E %2.4F %H SOG %.2I COG %03J"
Multiline
wxString MultilineString = _T("Info Button User Defined Values");
"%02A %2.2B%D %02E %2.2F%H %.1I %03J %02O %2.2P%R %02S %2.2T%V %03W %.2X %03.a"
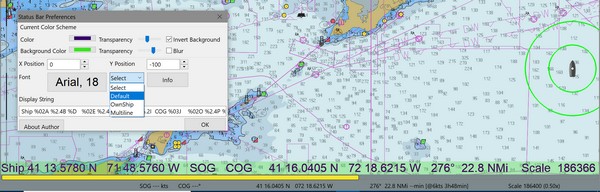
Select Dropdown - Default
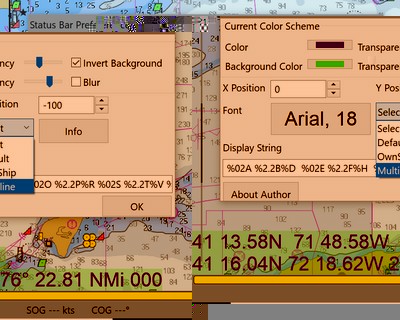
Select Dropdown - Multiline
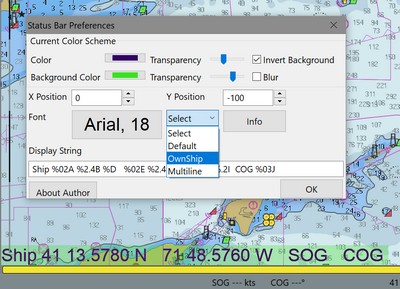
Select Dropdown - Ownship
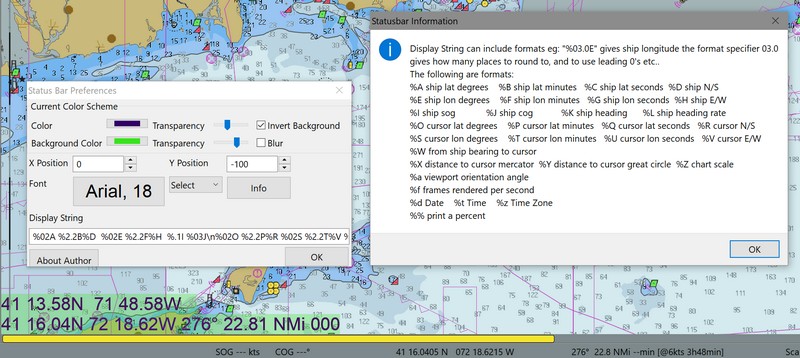
Info Button
The button Info displays a popup window with the Code key. The allowed Display strings can include the following formats:
For example:
"%03.0E\" Gives ship longitude.
The format specifier 03.0 gives how many places to round to, and to use leading 0’s etc.
The following are the specifier formats:
Code |
Description |
%A |
ship lat degrees |
%B |
ship lat minutes |
%C |
ship lat seconds |
%D |
ship North/South |
%E |
ship lon degrees |
%F |
ship lon minutes |
%G |
ship lon seconds |
%H |
ship East/West |
%I |
ship sog |
%J |
ship cog |
%K |
ship heading true |
%L |
ship heading magnetic |
%O |
cursor lat degrees |
%P |
cursor lat minutes |
%Q |
cursor lat seconds |
%R |
cursor North/South |
%S |
cursor lon degrees |
%T |
cursor lon minutes |
%U |
cursor lon seconds |
%V |
cursor East/West |
%W |
from ship bearing to cursor |
%X |
distance to cursor mercator |
%Y |
distance to cursor great circle |
%Z |
chart scale |
%a |
viewport orientation angle |
%f |
frames rendered per second |
%d |
Date |
%t |
Time |
%z |
Time Zone |
%% |
print a percent |
Sean D’Epagnier website is http://seandepagnier.users.sourceforge.net/ where you will find a “Donate” button.