The toolbar button
-
Radar not detected

-
Radar standby

-
Radar transmitting

-
Radar windows hidden

-
When radar overlay is enabled but the control menu is not shown it shows the control menu.
-
Otherwise it toggles the radar windows and overlay off (hidden) or on (shown).
Hiding all radar windows and overlay is useful if you are sailing into a highly complex situation where you want full view of the chart display and not have the distraction of radar windows and paints over your charts. The radar keeps its current settings (it keeps transmitting if this was on) until you un-hide (show) it again.
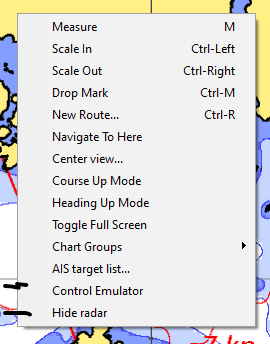
The OpenCPN context menu
There are also entries in the context menu for the radar plugin. The context menu is usually accessed by clicking the right mouse button on the chart window.
-
Hide radar
-
Show radar
-
Radar control…
Hide or Show radar should be self-explanatory. If chart overlay is enabled the Radar control… button will show the control menu for that radar only. If chart overlay is disabled it will show the control menu(s) for one or two radars.
The PPI window(s)
Up to four classic radar displays, known as Position Plot Indicators (PPI) by professionals, can be shown. You can hide these if so desired (which makes sense only if you enabled the overlay over the chart). You can resize, move or dock them into the chart display. To close them you use the default OS button on the top of the window. To dock or undock them, open the radar control menu and select Windows > Float/Dock PPI .
The author likes to use two radar ranges with the windows docked on the right side of the display, one above the other. But just try it out to see what you like best.
The PPI window has a Menu button that accesses the control menu. If you moved the PPI window since the last time you accessed the control menu the menu will come up immediately above the Menu button on the PPI window.
The control menu
Every radar has its own control menu. If radar overlay is enabled and you have hidden the control menu of the radar assigned to radar overlay, press the toolbar icon to access the control menu. If all else fails you can access this using the context menu on the chart display (Right mouse button > Radar control …)
The control menu only shows those options which are functional for the particular state of the radar, and has various sub-menus.
The main menu
When the radar is not transmitting the menu looks like this:
| Button | Possible values | Purpose |
|---|---|---|
Adjust |
Change basic settings such as range, gain, clutter |
|
Advanced |
Change advanced settings |
|
View |
Picture orientation and trails |
|
Cursor |
Information and settings driven by the cursor |
|
Guard zones |
Controlling the guard zones |
|
Window |
How the PPI or overlay is displayed |
|
Timed transmit |
Schedule radar transmission |
|
Start/Stop radar |
Standby, Transmitting, Timed state |
Toggle radar transmit state |
Note: Your radar may not support all shown items, in which case they are not shown in the menu.
Note: Unlike earlier releases, all menu items that your radar supports are always shown. If they cannot be enabled they are shown greyed out.
Adjust menu
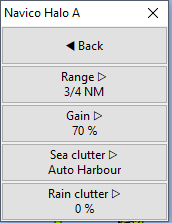
This allows you to set radar gain, sea clutter, rain clutter and range. Range can be set to Auto if the radar picture is overlayed on the chart. Depending on your radar type several auto modes are possible for sea clutter.
Advanced menu
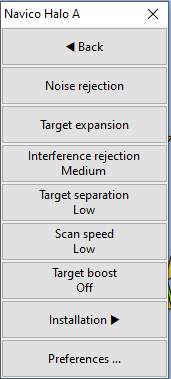
The advanced settings allows other settings to be modified. These are radar specific. You can also go even deeper to the Installation menu, which allows modification of radar settings such as the heading correction and mount height.
View menu
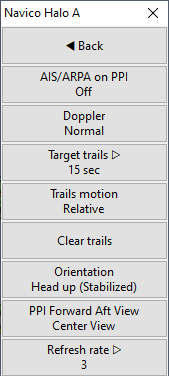
The view menu allows modification of how the radar picture is viewed. You can set the orientation and center of the radar picture in the PPI window. You can also change the refresh rate; if you want a continuously sweeping update increase the refresh rate. If your computer cannot keep up with the radar picture (high CPU or GPU load) or you are using a remote viewer such as VNC you can lower the refresh rate.
The target trails options will make radar targets linger on the screen, shown in a white-grey palette. Target trails are especially useful if your radar is having trouble with reliable target detection. It can also be used as a poor-mans doppler effect: if the radar heading stabilization would be perfect, only moving targets will show a large trail. You can switch between true and relative trails. The latter shows the target’s motion relative your own course and speed.
You can also modify whether AIS and ARPA triangles are shown on the PPI windows.
Lastly, for HALO radars that support it we can enable the Doppler mode built into these radars; with Doppler the radar will show clearly (in yellow) which targets are moving more than 3 knots towards or away from the radar.
Cursor menu

The PPI windows will always show where the cursor on the main chart window is in blue, and if you click on the chart or PPI window this position will be marked with a white cursor.
The cursor menu will allow you to use this white cursor mark. You can either use it as an EBL/VRM mark, which shows an Electronic Bearing Line (EBL) with a range ring (Virtual Range Mark). The EBL/VRM can be used as a "memory" so that you can compare the current position of a target with an earlier position and range.
The other use is that you can have the radar acquire a target that is at or near the cursor location. This is called MARPA - Mini Automatic Radar Plotting Aid. If the MARPA target is seen another 2 revolutions of the scanner it will be converted into an AIS-like target that is shown both on the PPI window (if enabled on the View menu) and the chart displays. The plugin supports 50 (M)ARPA targets. See Guard Zones below for ARPA.
Guard zones menu

You can define two guard zones where, if targets are seen in that sector of the radar, they will either sound an alarm and/or be converted into an ARPA target.
Which option you prefer is dependent on what sort of environment you are sailing in; in congested waters it may be advantageous to use the ARPA facility for a guard zone that extends ahead of the boat. This way boats without an AIS will automatically be converted over to ARPA targets.
If you choose to have the guard zones raise an alarm you will see an alarm dialog box and a voice over saying ``Alarm: Targets detected''. If you confirm the alarm it will not be raised until the targets have disappeared from the guard zone and re-appear.
Window menu
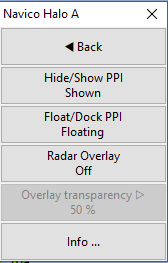
Via the window menu you can choose whether the PPI window is shown and whether the radar picture should be overlayed over the chart window. For the latter to be enabled you need GNSS position and heading (or COG, see Preferences.)
You can also dock the PPI window. This means that the PPI window is not shown as a separate window, but shown on the right side of the chart(s) on the main OpenCPN window.
You can also access the Info window which will show automatically if something is wrong or a setting is insufficient. This allows you to check the detected radar type(s) and how many radar spokes are received.
Timed transmit
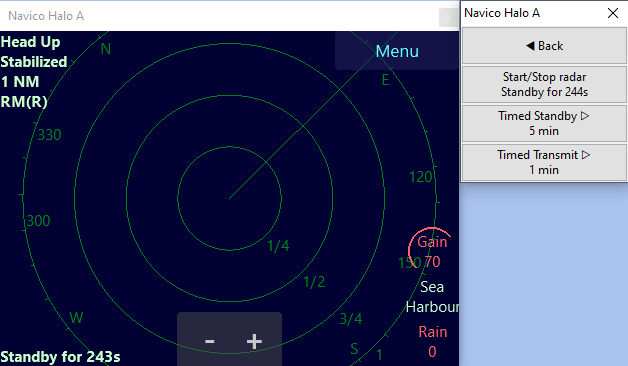
Timed transmit is useful for magnetron radars that (a) use a lot of power and (b) have a limited life span. For modern non-magnetron digital radars this is not really useful.
It allows you to set both the on time and the standby time of the radar. When activated the status will be shown at the Control menu > Start/Stopp button.