Configuration
-
Open the OpenCPN Toolbox by clicking on the cogwheel icon in the main toolbar
-
Navigate to the
Pluginstab -
Select the DashboardSK tile and click on the
Preferencesbutton

Own vessel identifier (1)
Signal K context of the own vessel. The initial vessels. must be ommited. The value is normally filled automatically as soon as it is received from the OpenCPN core application and there is no need to edit it manually.
Configuration data editor (2)
The JSON configuration data of the plugin can be edited directly using a visual editor after clicking on the Cfg edit button. This option is recommended for experienced users and general caution is strongly recommended.

When the edited data is applied, and whenever a configuration, dashboard or instrument is imported from a file, the JSON is validated against the plugin configuration schema. If it does not match, the change is rejected and the reported problems are shown, leaving the current configuration untouched.
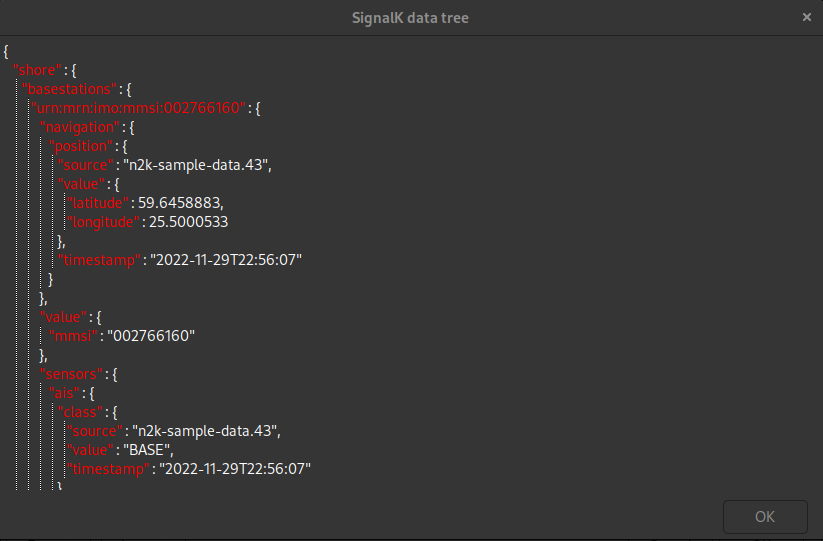
Signal K data tree viewer (3)
The data tree constructed from the received Signal K delta messages can be displayed as a collapsible tree structure by clicking on the Signal K button.
Dashboard creation (6)
Clicking on the New button opens a dialog allowing the user to specify the name of the newly created dashboard.
Instrument list (7)
List of instruments in the currently selected dashboard
Icon |
Description |

|
Add new instrument to the current dashboard |

|
Remove selected instrument |

|
Move the selected instrument up one position |

|
Move the selected instrument down one position |

|
Export the defienition of the selected instrument to JSON file |

|
Import an instrument from a JSON file and add it to the current dashboard |
Instrument settings (8)
Detailed configuration of the selected instrument. Refer to the documentation of individual instruments for detail about the parameters each of them has. Changes in parameters are reflected in the displayed instrument as soon as an action out of this are is performed, for example different instrument is selected form the list on the left, but not persisted until the OK button is pressed.
Dashboard placement and appearance (9)
| Option | Description |
|---|---|
Enabled |
Checkbox enabling/disabling the dashboard |
Canvas |
Id of the chart canvas on which the dashboard is displayed |
Page |
The plugin allows grouping dashboards on pages to allow complex setups while maintaining enough space for the chart canvas. If more than one page is defined, a pager control is displlayed in the lower left corner of the screen allowing switching between pages. The pager control also provides a context menu accessible using right-click to quickly access the preferences, switch page or hide the dashboard completely. image::pager.png[Pager control with context menu] |
Anchor |
Edge of the screen to which the dashboard is docked. The Own ship option centers the dashboard’s instruments in a horizontal row on OpenCPN’s own-ship position. The dashboard is hidden when the position is unavailable or outside the canvas. |
Offset h |
Horizontal offset from the edge of the screen. Ignored for the Own ship anchor. |
Offset v |
Vertical offset from the edge of the screen. Ignored for the Own ship anchor. |
Spacing h |
Horizontal spacing between the instruments in the dashboard |
Spacing v |
Vertical spacing between the instruments in the dashboard. Ignored for the Own ship anchor. |
Changes performed in this area are immediately reflected on screen, but not persisted until the OK button is pressed.
Dashboard Export and Import (10)
The buttons in the lower left corner allow exporting the complete definition of the current dashboard and all the instruments it contains to a JSON file which can be imported back to the plugin. All the keys refering to own vessel are converted to vessel.self during export. During import, the vessel.self paths are converted to point to the paths refering to the own vessel identifier.
Preferences persistency (11)
The changes in configuration are reflected in the displayed instruments as soon as feasible - dashboard appearance settings immediately, instrument settings as soon as an action is performed out of the instrument settings part of the dialog. This allows an immediate inspection of the effect of the configuration changes performed, but the configuration is persisted and permanently applied only after the OK button in the lower right corner of the preferences is pressed. In case the Cancel button is pressed or the dialog is closed, the plugin remembers the original state of the configuration from the moment the preferences dialog was opened and reverts back to it.