AISradar View
This document is about AIS Radar View plugin (Ais-radar)
Links
-
Source: Github Repository - Nohal branch
-
Source Original: Original Github Repository
-
Maintenance Source: https://github.com/rgleason/aisradar_pi
-
Forum: AIS Radar Plugin
What and Why
Installation
Note: In this section the instructions are specifically for AIS Radar-pi, but there is a dedicated page in the manual with information about Downloading, Installing and Enabling Plugins in general. That dedicated page can be found here
AIS-Radar-pi can be installed directly from the OpenCPN GUI. It can also be downloaded from http://www.opencpn.org/index.html which has download links for Windows and MacOSX.
B. How to install the plug-in
Make sure you choose the file that is compatible with your
computer system. In this manual we presume it’s Windows, so we choose the
Windows setup-package.
Download the file (double-click).
We assume you know where to find the files you download from the Internet (if you don’t: quit now and read the manual of your computer before doing anything else with it
Double-click the downloaded file and follow the set-up instructions.
That’s it. But before you can actually use the plug-in, you first have to enable that plug-in in OpenCPN.
Enabling the plug-in in OpenCPN
Open (or restart) OpenCPN.
Click Tools-Options-Plugins
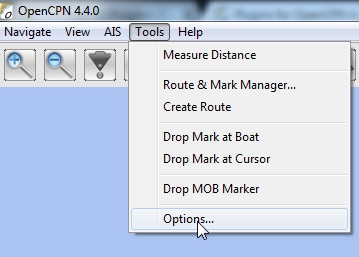

Scroll down untill you see the AIS Radar-pi.
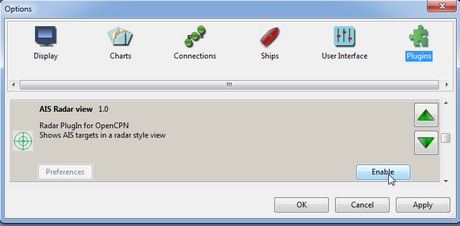
Click “Enable” and then “Preferences”.
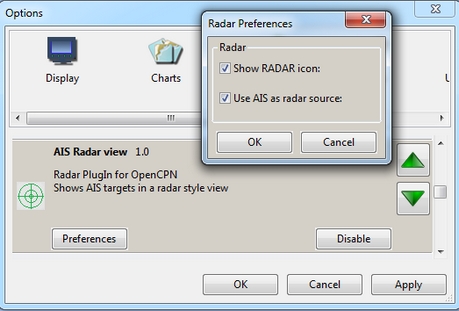
The list of preferences is simple:
-
Show RADAR icon
-
This box toggles displaying the icon in the OpenCPN icon bar.
-
-
Use AIS as Radar Source.
-
Ticking this box will allow AIS Radar View to use the information from your AIS receiver (make sure your AIS receiver is set up in OpenCPN in “Tools”-“Options”-“Connections”).
-
Click “OK”.
Now the AIS Radar icon should appear somewhere in your OpenCPN Toolbar.
Standard actions
When you click the AIS Radar-pi icon, you will see a radar-screen like
representation of the AIS-targets around you.
They are represented by triangular ship-icons. Yellow if not fully
recognized yet, green when fully recognized.
When your own ship has not just an AIS-receiver, but an AIS transponder (and sends AIS signals), you will see such an icon in the centre of the screen. That’s you.
On the bottom of the screen you can set some options. You can set different ranges in AIS Radar. From 0.25 nm to 32 nm.
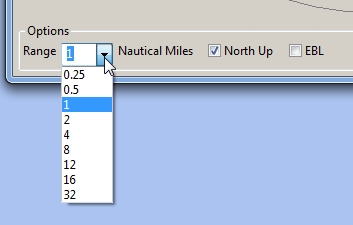
You can also choose “North Up” (when it’s not selected, the view will be “Course Up”) and you can select “EBL” (“Electronic Bearing Line”).
With EBL selected, a mouse-click on the AIS Radar screen will give you a
bearing in degrees. That bearing is always in degrees relative to North,
not relative to your course.
Operation
Two operating modes are possible:
-
North-up,
-
COG up, or “Course Up”.
You can select “North Up” on the bottom of the screen.
If you select “North Up”, you will see the text “North Up” in the right
hand top corner of the AIS Radar Screen.
If you do not select “North Up”, AIS Radar Screen will operate in
“COG up” mode and you will see the text “Course Up” in the right hand
top corner of the AIS Radar Screen.
Mode "North up"
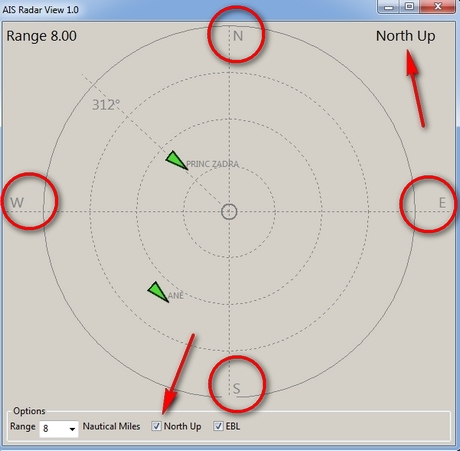
“North Up” is selected. You will see the text “North Up” in the right
hand top corner of the AIS Radar Screen.
Also you will see the letters “N”, “E”, “S” and “W”. They
indicate North, East, South and West.
The range is set to 8 nautical miles.
The center of the screen, where the vertical and the horizontal axes
cross, is your own position.
All vessels with an AIS transmitter, Class A or B, within the chosen
distance, will be displayed on the screen (“AIS-targets”) and their
positions will be updated as they (and/or you) move.
There is no ship-icon in the middle. That is because in this example you
are only receiving AIS-signals and not sending them.
If you would be transmitting AIS-signals, you would see a ship-icon (us)
in the middle of the screen. If your boat does not send AIS-signals
but you do see a ship-icon in the middle of the screen, you have
rammed another ship! (maybe you should have set a Watchdog-alarm?)
Note: the AIS Radar relies not only on the other ships sending AIS-signals, but also on your equipment receiving those signals!
“EBL” (Electronic Bearing Line) is also selected.

In the top left quadrant of the screen you see an AIS Target. It is the “Princ Zadra” coming from the North West. By putting the mouse-cursor on that ship and clicking, the EBL will tell you the true bearing of that ship from your position. In this case that true bearing is 312 degrees. It’s true, believe us.
Any target that:
-
moves towards the center of the screen is a boat that can “potentially”, collide with the boat of the user.
-
moves away from the center of the screen, is a boat that presents no risk of collision with the boat of the user.
Mode "Course Up" ("COG up")
If you do not select “North Up”, AIS Radar Screen will operate in “COG
up” mode and you will see the text “Course Up” in the right hand top
corner of the AIS Radar Screen.
The next screenshot is the same situation as described in the part ”
Mode “North up”, but now in “Course Up” mode.
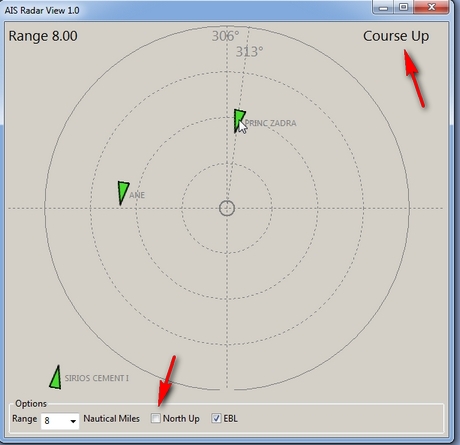
Note that the numerical value displayed at the top of the vertical axis gives your COG. In this case that numerical value is 306 degrees. That means you are heading North West.
Also note that on the screen the “Princ Zadra” (which is coming from
the North West) is now coming almost straight “down” towards you.
Theoretically, in “COG up” the targets directly in front of your ship
should be permanently oriented towards the top of the screen. BUT, also
note that with each variation of your own COG, the entire screen rotates
either in one direction or the other. It’s movements are non-existent if
you follow a constant heading.
Any target that:
-
moves towards the center of the screen is a boat that can “potentially”, collide with the boat of the user.
-
moves away from the center of the screen, is a boat that presents no risk of collision with the boat of the user.
Remarks
Keep in mind that the plugin has advantages but also some things to be aware of. The big advantage of AIS Radar is that it is not very complex. But keep in mind that the information on the screen is sometimes less than the information you will get in the “normal” AIS Target Information on the main screen of OpenCPN.
We will illustrate that with a few screenshots of a ship approaching us from our port quarter.
It’s a ship called “Eemshorn”.
Looking at the AIS Radar screen you might think she is just an ordinary ship like any other ship.
This is the info on the AIS Radar screen.
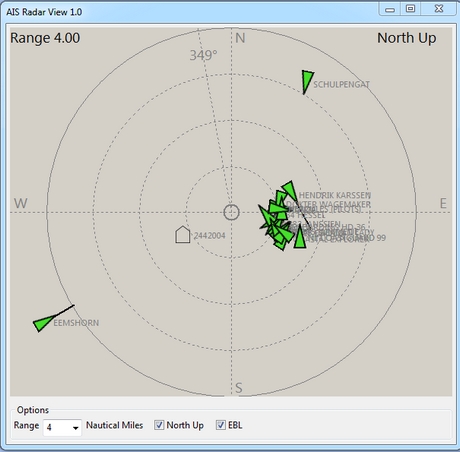
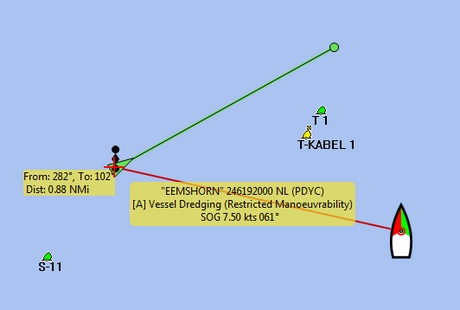
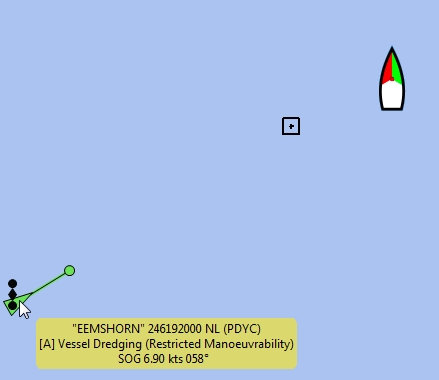
But the AIS Target Information on the main screen of OpenCPN would give you some important additional information. In this case that she is a dredger and restricted in her manoeuverability.
This is the info on the OpenCPN screen.
And instead of the EBL in AIS Radar you could use an EBL made with the plugin OpenCPN DRAW (ODraw).
This is the info on the OpenCPN-screen with an EBL made with ODraw.
